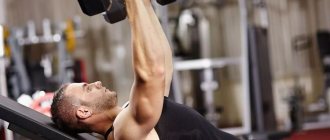
Squats with a barbell on your shoulders
Read Elena's analysis, it's really detailed. Now let's go over the main points of performing squats with a barbell.
- During the exercise, you should not lift your heels off the floor - if you cannot squat low enough without lifting your heels, then you have problems with the flexibility of your ankles, and probably your hip joints
- You need to keep your back straight and not lean forward throughout the entire exercise. Follow this strictly if you don’t want various problems with the spine to appear.
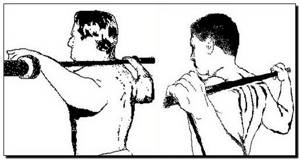
- The position of the barbell on the shoulders is the safest, although at first unusual option - an arrangement in which the barbell is located quite low - not at the base of the neck, but on the rear delts. In this position of the barbell, you will automatically have to squeeze your shoulder blades together, straighten your chest and take the safest body position for a squat.
- In addition, when the bar is lower , you are less likely to “peck” your nose and fall forward - this improves not only your technique, but also reduces the load on your lower back. This is another important plus. Try placing the barbell low, get a stable position, and when you get used to it (at first it may be unusual to put pressure on the bones of the shoulder girdle), you will realize how much better your squat has become
- The grip of the barbell should be slightly wider than your shoulders - as far as the mobility of your joints allows you
- After you have removed the bar from the racks and moved a couple of steps back from them, we begin the squat. It is necessary to bend your knees slightly, at the same time move your chest forward and up and move your pelvis back a little
- Move your pelvis as if you were sitting on a chair located behind you!!!
- When lowering down, you need to inhale in the first third of the movement
- The depth of the squat should be quite low - the guideline is when your upper thighs are parallel to the floor
- Without pausing in the lower position, return to the starting position
- While lifting, exhale – also in the upper third of the movement.
Effective exercises for the front of the thigh
The workouts are quite simple and are perfect not only for those who are professional athletes, but also for beginners. They can be done both in the gym and at home. If you follow the technique, the effect will be noticeable within a few weeks.
Squats with a barbell or dumbbells
The diagram for performing this exercise for the front surface of the thigh looks like this. First, you need to stand with your feet shoulder-width apart with weights in your hands. It is worth noting that your back should be straight. As you inhale, lower yourself down, reaching to the floor, with maximum tension in the muscles of the thighs and buttocks. Then, as you exhale, slowly return to the starting position. The best option is 2 sets of 25 repetitions.
Lunges
It is considered one of the most effective exercises, and at the same time quite simple. Its implementation rarely causes pain in the knees. There are many types of this exercise, including:
- Lunges forward – feet shoulder-width apart, back straight. As you exhale, you need to take a step forward and lower yourself down, and as you inhale, take the starting position. It is recommended to do 2-3 sets of 10 repetitions for 1 leg.
- Back lunges - performed similarly to the above option, but the step is taken backwards. In this case, the main load goes to the second leg.
- Bulgarian lunges are a rather complex technique, but they are more effective. As you inhale, one leg should be relaxed and moved forward, and the other should be supported. Then a lunge is carried out on the relaxed limb until a right angle is obtained (90 oC). The load should be directed towards the heel.
Lying leg raises
It has a complex effect on all muscle groups. Helps get rid of fat deposits and lose weight. To perform the lift you must:
- Lying on a sports mat, straighten your legs and try to stretch them as much as possible.
- Inhale and lift your left leg up, keeping it straight. As you exhale, lower down.
- Repeat the same thing, but with the right leg.
To get results, it is enough to perform alternately 25-30 times in 3 approaches. For more intense muscle training, it is recommended to hold your leg in a raised position for a few seconds.
"On my knees"
This should definitely be included in your training schedule. The technique is aimed at developing stretching and also prevents pain in the legs. Kneeling squats are performed as follows:
- You need to take a kneeling position with your body straight.
- As you inhale, you should move the pelvis back and to the right, and then try to take a sitting position so that your legs are next to your pelvis.
- As you exhale, you need to return to the original position and repeat the movements again, but on the other side.
The duration of the exercise for the outer thigh is 20 minutes with pauses every 30-40 seconds.
Stepping onto a support
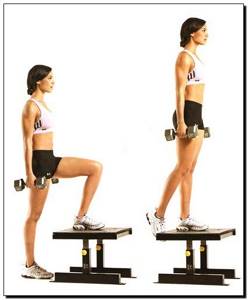
Here we must take into account that such steps are rather pelvic-dominant exercises, however, the load on the front surface of the thigh in this exercise is quite pronounced, and this exercise is excellent for making home workouts more difficult. In order to shift the load on the muscles of the anterior thigh, it is necessary to perform steps with the platform positioned on the side.
I don’t know whether it’s worth mentioning or not, but when using this exercise in home workouts, choose the widest and strongest chair possible so as not to fall over while doing the exercise.
I had a friend who decided to perch on a stool at home with 40 kg dumbbells. The stool collapsed under him, and his friend then walked for 2 weeks as if he had been impaled, such was the discomfort in his spine.
And there is one more mistake that many make - pushing off strongly with the lower leg. Such a push-off not only reduces the load on the leg that is standing on the support, but can also provoke a sprain due to the sudden movement.
Therefore, be careful not to allow such a sudden movement - pushing away.
Workout Basics
So that physical exercise brings maximum effect and benefit to the body as a whole.
Some training recommendations should be followed:
- Before starting a workout, you should objectively assess the physical condition of your body (if you feel unwell, it is better to postpone the workout for a while, since it will not bring any benefit, but it can cause harm).
- Monitoring your pulse and breathing throughout the entire session is mandatory. The heart rate should not exceed the normal limits for a particular age category and level of physical fitness.
- It is important to adhere to the drinking regime during training (you need to drink purified drinking water without gas).
- You should not eat immediately before training (at least 1.5 hours must pass since your last meal).
- Physical activity should be regular. The optimal number of workouts per week is from three to five.
- It is recommended to start each workout with a warm-up and end with a cool-down.
Warm-up
Before starting intense exercise, you need to warm up. This is necessary in order to avoid injuries during training (sprains, muscles), as well as to prepare the cardiovascular and respiratory systems for active work.
To warm up, it is enough to perform 10-15 exercises of 10-12 repetitions each. When warming up, special attention is required to those muscle groups that will receive the most intense load when performing the main set of exercises.
In this case, these are the leg muscles.
- Starting position No. 1: feet shoulder-width apart, arms along the body. You should take a deep breath, raising your arms up, then slowly exhale completely, while your arms smoothly lower down.
- Tilts the head to the side.
- Tilts the head forward and backward.
- Circular movements of the shoulders.
- Starting position No. 2: feet shoulder-width apart, arms bent at the elbows, located in front of the chest.
It is necessary to alternate between moving your arms back, bent at the elbows (returning to the starting position), with moving your straight arms back (returning to the starting position again). It is best to start exercises on the anterior surface of the thigh with a warm-up. - Starting position No. 3: feet shoulder-width apart, hands on the belt. Bend the torso to the sides.
- Bend forward and backward.
- Starting position No. 3: Perform deep lunges to the side alternately with each leg. When performing the exercise, you need to ensure that your back is straight. In the lower position, the heels are not lifted off the floor, the feet are placed parallel to each other. Lunges are performed slowly, without jerking.
- Lunges forward.
- Circular rotations of the body in each direction 5-8 times.
- Circular rotation of the feet clockwise and counterclockwise for 10-15 seconds. each leg.
- In a standing position, place your right foot on your heel in front of you. Pull the toe towards you and hold this position for 10-15 seconds. They change the leg.
- From a standing position, perform smooth downward bends, trying to touch the floor. In the lower position they linger a little, then return to their original position. The legs do not bend at the knees during the exercise.
Bulgarian split squats
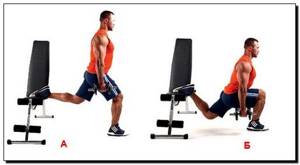
Another single-leg variation of a knee-dominant exercise is the Bulgarian split squat. To be honest, I don’t include it in my regular training, because I don’t like this exercise for three reasons.
1. Too much load on the knee of the front leg.
2. When you do it in swimming trunks, ask someone to take a photo of you from behind, you will see everything for yourself. The point is not that one buttock will be higher than the other, but that the pelvic bones will be skewed. Even from a theoretical point of view, such distortions can lead to problems, but from a practical point of view, I focus more on sensations, and the sensations from such a distortion are not very pleasant.
3. And finally the third reason. The leg with which you lean on the support is in a stupid position from a biomechanical point of view. Even an experienced person finds it difficult to maintain balance, but what about beginners?
This exercise is just from the series “Look, we came up with something new” - it looks like lunges, but one of the legs is on a raised platform - a bench, or at home on a bed or sofa.
Think for yourself, decide for yourself (c), but it is better to load the front surface of the thigh with other exercises.
Basic scheme. The main thing in the exercise
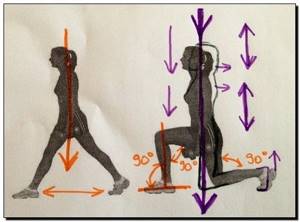
- basic pose (starting stance)
- movement “there”
- the final position is usually the position of maximum (isometric) muscle tension
- "backward" movement
- correct “entry” and “exit” from the main position. This mainly applies to all exercises when doing them with additional weights, since a barbell or dumbbells increases the risk of pulling the wrong muscle during the initial balancing act.
- the main (initial) position in the picture is that the legs are placed so wide that when squatting, three right angles are obtained. The heel of the leg that is behind comes off the floor and “looks” up. The front leg remains completely on the floor throughout the exercise.
- very important point: the body moves vertically downwards! The picture on the right is a little crooked (with incorrect technique) - the contour is drawn as it should have been: the knee “looks” down and is directed down vertically during movement
- The body is straightened: the chest is proudly straightened, the shoulders are lowered down and back. It should feel like your upper body is moving slightly backward as you move up and down.
A set of stretching exercises
Exercises for the anterior thigh include more than just strength exercises.
Stretching is a very important element of training; it allows muscles to relax after intense exercise, and also helps to improve the process of breaking down fats in tissues.
To effectively stretch, and at the same time not harm your health, you need to adhere to the following rules:
- Classes must be systematic.
- You should be in the stretching position for at least 10 seconds, gradually this figure can be increased to a minute.
- Breathing should be calm and uniform, without delay.
- You cannot stretch the muscles until pain appears. Only a feeling of discomfort in the muscles, but not pain, is acceptable.
Examples of stretching exercises
Standing anterior thigh stretch. Starting position: standing on your left leg, grab your right ankle with your right hand, bent at the knee.
Exercise technique:
- Smoothly pull the heel of the right foot towards the buttocks and count to 10.
- Slowly lower your leg down.
- Perform the exercise with the second leg.
Stretch the front of the thigh in a lunge position. Starting position: standing on your left knee. The right leg, bent at the knee at a right angle, stands on the floor in a forward position, the heel is pressed to the floor. The elbow of your right hand can rest on your right knee.
Exercise technique:
- The body is moved forward, the pelvis is slowly lowered down.
- Then with your left hand you need to grab your left foot and smoothly pull the heel towards the buttock. Keep your back straight and look forward.
- The heel of the right foot and the left knee do not leave the floor.
- Stay in the stretching position for 10 seconds, then smoothly lower your foot to the floor.
- Repeat the exercise with alternating legs.
Stretch the front of the thigh while sitting. Starting position: sitting on a gymnastic mat, bend your knees all the way and spread them apart. The feet are pulled as close to the pelvis as possible.
Exercise technique:
- They try to touch their knees to the floor.
- In the maximum position they are held for 10 seconds.
Positioning the legs. Very important point
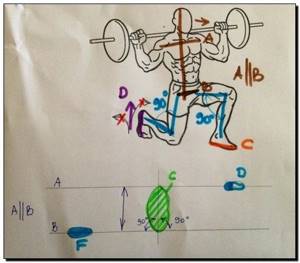
- First, let's look at the bottom diagram - the feet are on parallel lines A and B
- The width of parallel straight lines is at the level of shoulder width or hip width. Whatever is wider, should be placed at the level of that
- F – the leg in front is completely on the floor, the foot is NOT turned in or out
- The leg behind is on the toe, but when moving down, the heel goes straight up, as if “looking” at the ceiling
- That green cloud is a torso, with a flat butt at the back