Exercises with a rubber band
Exercises with a rubber band
A rubber band is a rubber band 3.5 meters long, 5 centimeters wide and weighing 200 grams. When rolled up, it is no larger than a tennis ball. Its compactness and light weight allow you to always have it with you and practice in any place, even one not equipped for sports. Exercises with a rubber band are very effective, and it is not without reason that athletes widely use them for warm-up and special training. Compared to an expander, a rubber band provides much more possibilities: with it you can do exercises that simply cannot be done with an expander.
Exercises with a rubber band can be included in morning exercises or a special time can be set aside for them. When practicing, follow these rules: in the starting position, the bandage should be slightly stretched. All exercises should be done with full amplitude and without sudden movements, and the return to the starting position should be smooth and with resistance. Repeat each exercise 10–15 times, first in one approach, and then in two or three.
After performing each exercise, pause for 30–40 seconds, relaxing the muscles that were subjected to the greatest load.
1. Raise your hands with the rubber band up to shoulder width. While stretching the bandage, lower your straight arms to the sides so that the bandage is in front of your chest - inhale. Then smoothly raise your arms to the starting position - exhale (Fig. 63).
2. Stand in the middle of the rubber bandage, wrap the ends around your hands and lower them down. Turn your palms forward and, without bending your arms, lift them up through the sides - inhale, then smoothly lower them to the starting position - exhale (Fig. 64).
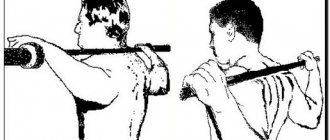
3. Place your feet shoulder-width apart, stepping on the middle of the bandage. Bend your torso forward, take the ends of the bandages in your hands and hold them on the back of your head. Straighten your torso - inhale, then return to the starting position - exhale (Fig. 65).
4. Stand in the middle of the band with your feet shoulder-width apart. Take the ends of the bandages in your hands and lower them along your body, palms forward. Alternately bend and straighten your arms at the elbow joints. Breathing is arbitrary, uniform (Fig. 66).
5. Stand in the middle of the bandage, hold the ends in your hands behind your head, raise your elbows up. Straighten your arms without changing the position of your elbows - inhale. Return to the starting position - exhale (Fig. 67).
6. Secure the middle of the rubber bandage in front of you at waist level, take the ends of the bandage in your hands, tilt your torso forward and stretch your arms forward. Make simultaneous forward circular movements with straight arms, as with the “dolphin” swimming method. Don't hold your breath. Raising your hands, inhale, and lowering them, exhale (Fig. 68).
7. Secure the middle of the rubber bandage to the ceiling, raise your arms up and grab the ends of the bandages so that they are in a taut position. Without bending your elbows, lower them down through your sides until they touch your hips, then slowly raise them to the starting position. Raising your hands up, inhale, lowering them down - exhale (Fig. 69).
8. Lie on your back, secure your toes to a fixed support, secure the middle of the bandage behind your head and, holding its ends, bend your arms to your shoulders. Without bending your knees, raise your torso to a sitting position, then smoothly return to the starting position. In the starting position, inhale, raising your torso - exhale (Fig. 70).
9. Lie on your back, secure a rubber bandage behind your head, raise your arms up. Wrap the ends of the bandage around your hands and, without bending them at the elbows, lower them down until they touch your hips - exhale, then raise your hands to the starting position - inhale (Fig. 71).
10. Lying on your stomach, bend and straighten your knees, overcoming the resistance of the rubber bandage attached to the ankle joints. The middle of the rubber bandage is secured to a fixed support. Perform the exercise until the muscles become tired (Fig. 72).
11. Stand in the middle of the resistance band with your feet shoulder-width apart. Sit down and grab the ends of the bandages with your hands so that the bandage is taut, keep your hands near your shoulders, keep your torso straight. Stand up - inhale, then, bending your legs, return to the starting position - exhale. Repeat the exercise until the muscles are tired (Fig. 73).
12. Rubber bandage behind your back. Place your left arm straight against your thigh and your right arm bent toward your shoulder. In this position, the bandage should be in a taut position. Extend your right arm upward until fully straightened - inhale, bending your arm, return to the starting position - exhale.
While performing the exercise, keep your torso straight. Do the exercise with the other hand (Fig. 74).
source
What is an elastic bandage used for?
We need to start with the fact that an elastic bandage, or Martens bandage, is used both to treat various diseases and to prevent the development of certain ailments and mechanical injuries to the musculoskeletal system. Thus, it is important to note that a specific treatment and preventive tool is used in traumatology, rehabilitation after surgery, treatment of diseases of the cardiovascular system and other medical fields.
At the same time, it is common to use a bandage in everyday life, for providing first aid, as well as for carrying out preventive measures when implementing varying degrees of stress on ligaments, joints and muscles. Also, a specific bandage is an integral part of every military first aid kit, where most often this product is used as a tourniquet to stop bleeding.
Regarding specific indications, it should be noted that the described bandage is used to treat injuries to the legs and arms, in particular joints, muscles, tendons and ligaments, such as tears, sprains or ruptures. They implement therapeutic procedures of symptomatic significance for varicose veins, thrombophlebitis, and lymphatic edema.
EXERCISES WITH A RUBBER BAND
EXERCISES WITH A RUBBER BAND
A rubber bandage is a rubber band 3.5 meters long, 5 centimeters wide and weighing 200 grams. When rolled up, it is no larger than a tennis ball. Its compactness and light weight allow you to always have it with you and practice in any place, even one not equipped for sports. Exercises with a rubber band are very effective, and it is not without reason that athletes widely use them for warm-up and special training.
Compared to an expander, a rubber band provides much more possibilities: with it you can do exercises that simply cannot be done with an expander.
Exercises with a rubber band can be included in morning exercises or a special time can be set aside for them. When practicing, follow these rules: in the starting position, the bandage should be slightly stretched. All exercises should be done with full amplitude and without sudden movements, and the return to the starting position should occur smoothly and with resistance. Repeat each exercise 10-15 times, first in one approach, and then in two or three.
After each exercise, pause for 30-40 seconds, relaxing the muscles that bore the greatest load.
1. Raise your hands with the rubber band up to shoulder width. While stretching the bandage, lower your straight arms to the sides so that the bandage is in front of your chest - inhale. Then smoothly raise your arms to the starting position - exhale.
2. Stand in the middle of the rubber bandage, wrap the ends around your hands and lower them down. Turn your palms forward and, without bending your arms, lift them up through your sides - inhale, then smoothly lower them to the starting position - exhale.
3. Place your feet shoulder-width apart, stepping on the middle of the rubber bandage. Bend your torso forward, take the ends of the bandages in your hands and hold them on the back of your head. Straighten your torso - inhale, then return to the starting position - exhale.
4. Stand in the middle of the band with your feet shoulder-width apart. Take the ends of the bandage in your hands and lower them along your body, palms forward. Alternately bend and straighten your arms at the elbow joints. Breathing is arbitrary and uniform.
5. Stand in the middle of the bandage, hold the ends in your hands behind your head, raise your elbows up. Straighten your arms without changing the position of your elbows - inhale, return to the starting position - exhale.
6. Secure the middle of the rubber bandage in front of you at waist level, take the ends of the bandages in your hands, tilt your torso forward and stretch your arms forward. Make simultaneous forward circular movements with straight arms, as with the “dolphin” swimming method. Don't hold your breath. As you raise your arms, inhale, and as you lower your arms, exhale.
7. Secure the middle of the rubber bandage to the ceiling, raise your arms up and grab the ends of the bandages so that they are in a taut position. Without bending your elbows, lower them down through your sides until they touch your hips, then slowly raise them to the starting position. Exhale as you lower your arms down and inhale as you raise your arms up.
8. Lie on your back, secure your toes to a fixed support, attach the middle of the bandage behind your head and, holding its ends, bend your arms to your shoulders. Without bending your knees, raise your torso to a sitting position, then smoothly return to the starting position. In the starting position, inhale, raising your torso - exhale.
9. Lie on your back, secure a rubber bandage behind your head, raise your arms up. Wrap the ends of the bandage around your hands and, without bending them at the elbows, lower them down until they touch your hips - exhale, then raise your hands to the starting position - inhale.
10. Lying on your stomach, bend and straighten your knees, overcoming the resistance of the rubber bandage attached to the ankle joints. The middle of the rubber bandage is secured to a fixed support. Perform the exercise until the muscles become tired.
11. Stand in the middle of the resistance band with your feet shoulder-width apart. Sit down and grab the ends of the bandages with your hands so that the bandage is taut, keep your hands near your shoulders.
Keeping your torso straight, stand up - inhale, then, bending your legs, return to the starting position - exhale. Repeat until the thigh muscles are tired.
12. Rubber bandage behind your back. Place your left arm straight against your thigh and your right arm bent toward your shoulder. In this position, the bandage should be in a taut position. Extend your right arm upward until fully straightened - inhale, bending your arm, return to the starting position - exhale. While performing the exercise, keep your torso straight. Do the exercise with the other hand.
source
Martens bandage: application
This bandage is used depending on the situation. So, to stop bleeding, initially a sterile gauze bandage must be applied to the wound, and if it is not available, a clean piece of tissue must be applied. Next, fixing one edge of the rubber bandage, tightly wrap the limb in order to apply pressure to the surface of the tissue and stop the bleeding. In case of massive trauma and damage to large vessels, emergency care should not only be immediate, but also correct. In this case, a Martens bandage is tightly applied directly to the surface of the skin above the site of injury (subject to arterial bleeding). The compression force should be such as to completely stop the pulsation below the application site.
In case of venous bleeding, a Martens rubber bandage must be placed slightly below the site of injury. In this case, the pulsation of large arteries should not stop.
In order to mobilize the damaged joint, the sequence of actions is as follows: a Martens bandage is applied directly to the skin, wrapping the damaged area several times. In this case, it is imperative to ensure that the bandage does not fit too tightly and does not compress the blood vessels. The fixation force must be sufficient to provide the necessary mobilization of the injured joint.
If a bandage is used to mobilize fractures, a splint must initially be prepared. After this, the damaged area should be covered with a thin layer of clothing and the limb should be fixed to the splint using a bandage. The tightness of the application should be sufficient to securely fix the bones, preventing their displacement during transport of the patient to the trauma department.
Exercises with a rubber band
From the book “Secrets of Athleticism”, author: Yuri Shaposhnikov
EXERCISES WITH A RUBBER BAND
A rubber bandage is a rubber band 3.5 meters long, 5 centimeters wide and weighing 200 grams. When rolled up, it is no larger than a tennis ball. Its compactness and light weight allow you to always have it with you and practice in any place, even one not equipped for sports. Exercises with a rubber band are very effective, and it is not without reason that athletes widely use them for warm-up and special training.
Compared to an expander, a rubber band provides much more possibilities: with it you can do exercises that simply cannot be done with an expander.
Exercises with a rubber band can be included in morning exercises or a special time can be set aside for them. When practicing, follow these rules: in the starting position, the bandage should be slightly stretched. All exercises should be done with full amplitude and without sudden movements, and the return to the starting position should occur smoothly and with resistance. Repeat each exercise 10-15 times, first in one approach, and then in two or three.
After each exercise, pause for 30-40 seconds, relaxing the muscles that bore the greatest load.
1. Raise your hands with the rubber band up to shoulder width. While stretching the bandage, lower your straight arms to the sides so that the bandage is in front of your chest - inhale. Then smoothly raise your arms to the starting position - exhale.
2. Stand in the middle of the rubber bandage, wrap the ends around your hands and lower them down. Turn your palms forward and, without bending your arms, lift them up through your sides - inhale, then smoothly lower them to the starting position - exhale.
3. Place your feet shoulder-width apart, stepping on the middle of the rubber bandage. Bend your torso forward, take the ends of the bandages in your hands and hold them on the back of your head. Straighten your torso - inhale, then return to the starting position - exhale.
4. Stand in the middle of the band with your feet shoulder-width apart. Take the ends of the bandage in your hands and lower them along your body, palms forward. Alternately bend and straighten your arms at the elbow joints. Breathing is arbitrary and uniform.
5. Stand in the middle of the bandage, hold the ends in your hands behind your head, raise your elbows up. Straighten your arms without changing the position of your elbows - inhale, return to the starting position - exhale.
6. Secure the middle of the rubber bandage in front of you at waist level, take the ends of the bandages in your hands, tilt your torso forward and stretch your arms forward. Make simultaneous forward circular movements with straight arms, as with the “dolphin” swimming method. Don't hold your breath. As you raise your arms, inhale, and as you lower your arms, exhale.
7. Secure the middle of the rubber bandage to the ceiling, raise your arms up and grab the ends of the bandages so that they are in a taut position. Without bending your elbows, lower them down through your sides until they touch your hips, then slowly raise them to the starting position. Exhale as you lower your arms down and inhale as you raise your arms up.
8. Lie on your back, secure your toes to a fixed support, attach the middle of the bandage behind your head and, holding its ends, bend your arms to your shoulders. Without bending your knees, raise your torso to a sitting position, then smoothly return to the starting position. In the starting position, inhale, raising your torso - exhale.
9. Lie on your back, secure a rubber bandage behind your head, raise your arms up. Wrap the ends of the bandage around your hands and, without bending them at the elbows, lower them down until they touch your hips - exhale, then raise your hands to the starting position - inhale.
10. Lying on your stomach, bend and straighten your knees, overcoming the resistance of the rubber bandage attached to the ankle joints. The middle of the rubber bandage is secured to a fixed support. Perform the exercise until the muscles become tired.
11. Stand in the middle of the resistance band with your feet shoulder-width apart. Sit down and grab the ends of the bandages with your hands so that the bandage is taut, keep your hands near your shoulders.
Keeping your torso straight, stand up - inhale, then, bending your legs, return to the starting position - exhale. Repeat until the thigh muscles are tired.
12. Rubber bandage behind your back. Place your left arm straight against your thigh and your right arm bent toward your shoulder. In this position, the bandage should be in a taut position. Extend your right arm upward until fully straightened - inhale, bending your arm, return to the starting position - exhale. While performing the exercise, keep your torso straight. Do the exercise with the other hand.
source
How to get results quickly: ways and means to increase the effectiveness of training
For training to be effective and safe, the athlete must follow these recommendations:
- Train 2 to 4 times a week, combining exercises for fast and slow muscle fibers. On other days, work out other muscle groups (back, abs, legs), and also perform cardio exercises to reduce fat levels and quickly outline the relief.
- Periodically change old exercises from the complex to new ones so that the muscles do not get used to the load.
- Hone the technique of doing the exercises, when extending or lowering your arms, move as slowly as possible, do not lower your arms all the way so that the muscles do not relax, work at maximum amplitude.
- Train until your muscles fail.
- Periodically increase the weight of the equipment so that the muscles develop faster.
- Train for 60 minutes with no more than 2 minutes between sets.
- Maintain a sleep schedule. The athlete must rest at least 8 hours per day.
- Replenish your diet with protein foods (lean meat, fish, eggs, legumes), complex carbohydrates (whole grain products), and fiber (vegetables and fruits).
By following these rules, the athlete will notice the first results within 4 weeks.
Elastic band: effectiveness, pros and cons + 25 exercises with tape in GIFs
Elastic tape is sports equipment made of durable rubber (latex) for elasticity and muscle strength, physical rehabilitation and stretching exercises. With an elastic band, you can work on strengthening your muscles without using heavy weights.
We offer you all the most useful information about elastic band: pros and cons of use, effectiveness for weight loss, tips for choosing an elastic band, comparison with other sports equipment. And also a ready-made set of exercises with an elastic band for the muscles of the whole body.

Gym at home
It doesn’t matter what reason forced you to prefer working out at home: lack of time to travel to the gym, lack of a decent fitness club in your city, or the shamelessly inflated price of a trainer’s services. We will proceed from the simple fact that you decided to build your body yourself. This means you can’t do without some sports equipment. What might you need?
1. Medium-weight dumbbells – if only because it’s problematic to pump up your biceps without dumbbells at home, where you don’t have a couple of other exercise machines at hand. It would be great if you could also get a barbell.
2. Horizontal bar or parallel bars. Look in nearby yards and parks; a suitable projectile will certainly be found nearby.
3. Fitball is an optional subject, but desirable. It will partially replace your Scott bench and expand the range of possible exercises.
4. A chair or bench with stable legs to feel confident on it.
5. Thick towel.
General information about elastic tape
Resistance bands are becoming an increasingly popular tool for those who want to work on muscle strength and problem areas. If you have never tried exercising with a band, then you will be surprised how many benefits exercises with a seemingly ordinary elastic band bring. The elastic band is very easy to use, but extremely effective at working the muscles of the body. You will be able to work on developing muscle strength, endurance and flexibility. Moreover, this type of exercise puts minimal stress on the joints and connective tissues. As often happens, it is the simplest sports equipment that is the safest for health.
This type of sports equipment is actively used in strength training, Pilates, stretching and flexibility exercises. It is also called a rubber band, shock absorber tape or thera-band. Due to its compactness and versatility, the tape is widely used in home sports. Increasingly, professional trainers are demonstrating programs using this type of equipment.
A long, wide band made of durable rubber is popular both in gyms and at home. Elastic bands were originally used in physical therapy for the elderly and for people recovering from injuries. Now this type of expander has become a complete and very convenient alternative to free weights and exercise machines.
Let's take a closer look at the benefits of training with an elastic band. Why did this type of sports equipment become so popular and even successfully compete with dumbbells and barbells?
Benefits of training with an elastic band
- Compactness . The tape takes up very little space: after finishing your workout, just put it in a drawer until your next workout. The expander is ideal for use at home because it is very compact and suitable even for those who have limited free space.
- Lightness . The elastic band weighs almost nothing and is easy to carry. You can take it on a trip, on a business trip, on a trip, and even for a walk if you want to exercise in the fresh air. It will fit into a small bag or even a pocket.
- Low price . A rubber band can be considered one of the most inexpensive fitness tools. Its price in Russian stores starts from 200 rubles, and in foreign online stores you can order the tape for 2-3 dollars.
- Low chance of injury . When performing exercises with a rubber band, there is a simultaneous static and dynamic load throughout the entire range of motion. Therefore, training with an expander has a low impact on joints and ligaments, which reduces the likelihood of injuries and sprains.
- Work on all muscle groups . The elastic band allows you to work all the muscles of the body, but especially the muscles of the legs, arms, shoulders, chest, back, and buttocks. Almost all exercises that can be done with free weights can be done with bands.
- Adaptive load level . With a shock absorber band you will constantly work on your progress and strength development, because it has several levels of resistance depending on the elasticity of the rubber. You can also further adjust the intensity of the resistance by increasing or decreasing the tension. If you fold the elastic in several layers, you can further increase the load.
- Effective for Pilates and stretching . The rubber band is actively used in Pilates and stretching training: with its help, additional muscles are included in the work and the amplitude of movement is increased. At the same time, due to the low impact on the joints, training remains safe.
- Uniform load . The expander tape provides a uniform load along the entire stretching path, eliminating dead zones. Thanks to constant tension, the muscles do not relax at any point. This allows you to conduct your training as efficiently as possible.
- Technical performance . When performing exercises with an elastic band, the assistance of inertia during movements is excluded. For example, a barbell or dumbbell can be thrown up, thereby sacrificing technique and additionally loading the joint-ligamentous apparatus. It is impossible to do this with an expander, so you will be forced to perform the exercises technically and carefully, minimizing the risk of injury.
- Variety in training . As a rule, muscles adapt very quickly to the same movements, and this reduces the effectiveness of exercise. By adding new tools to your workouts, you will increase your workout productivity, which means you can achieve your goals much faster.
- Wider range of motion . Unlike other sports equipment, the tape can be easily worked in different directions: forward, backward, side to side and diagonally. Moreover, the angle, trajectory and range of movement are unlimited, which gives you the opportunity to work your muscles even better.
- Using familiar exercises . Band workouts often use familiar movements from traditional free weight strength training. For example, biceps curls, lateral raises, and vertical shoulder presses can be performed with both dumbbells and an expander.
- Versatility when performing exercises . The elastic band has no handles, so you can use any grip, vary the tension, or tie it in a ring around your legs. Due to the longer length, load variability is more significant.
- Suitable for women after childbirth . As a rule, after childbirth, weight training is prohibited due to the axial load on the spinal column and pelvic organs. In this case, exercises with an elastic band are recommended, which are based on the principles of static dynamics.
- Suitable for combined training . The resistance band is so versatile that you can even use it in conjunction with dumbbells, allowing you to get the benefits of two types of exercises at once:
Such obvious advantages as compactness, versatility, lightness, safety and low cost have made elastic tape one of the most popular products on the sports market. Now you can fully engage in strength training at home without the need to purchase dumbbells and barbells. However, the rubber band also has disadvantages and unpleasant features.
Disadvantages of Elastic Band Training
- Latex can cause allergies. The material for the manufacture of shock absorber tapes in most cases is latex, which is very allergenic. Redness, irritation, or swelling may occur in areas where the skin comes into contact with the tape. In this case, it is better not to practice training with an elastic band or to purchase a hypoallergenic latex-free band.
- Inconvenience during classes. During exercise, the elastic band can slip out of your hands, chafe your palms, or even cause irritation from the constant tension on its ends. In this case, you can use sports gloves with a non-slip coating.
- The elastic band wears out quickly. Unlike free weights, which have a very long lifespan, resistance bands are a short-lived product. Over time, they stretch, lose their original elasticity, or even tear.
- “Ceiling” in strength progress. Another disadvantage is that at some point it will no longer be possible for you to continue increasing the difficulty with the elastic band. Unlike free weights, the resistance level of an expander has a well-defined limit. So if your goal is to maximize strength, sooner or later you will have to turn to dumbbells, barbells or weight machines.
- It's hard to keep track of the results. When using dumbbells, you can easily track your progress because you know exactly what weights you are using in your workouts. With elastic band, there is no reliable way to quantify your performance.
Although exercises with resistance bands are biomechanically safer than exercises with dumbbells and barbells, they can also lead to damage to muscles, ligaments and tendons if the technique is incorrect. And if there is a lot of information about free weights on the correct execution of exercises (both in the literature and on the Internet), then there are much fewer detailed guidelines for training with an expander.
Therefore, be careful when training with an elastic band; before exercising, be sure to familiarize yourself with the technique of performing the exercises. If you train using a video, watch the instructor’s movements and try to follow all instructions exactly.

How to properly pump up your arm muscles
Most guys who train at home without sports equipment complain that they are unable to achieve the desired weight for a long time. They claim that they do 100 or more push-ups, but their muscles do not increase.
To understand what the problem is, you need to delve into the anatomy of the arm muscles. The main muscles include: biceps and triceps, it is thanks to them that the arms become sculpted. The first muscle is located on the front surface of the shoulder, it is responsible for bending the arms, and the second is on the back surface of the arms, it helps to extend the upper limbs. The triceps are larger than the biceps, so when doing exercises at home, you need to work this area as well.
This is interesting! The triceps occupy 2/3 of the total volume of the arm.
It is also worth paying attention to the muscles of the forearm. As you can see, you need to evenly distribute the load across all muscle groups. This will help you get pumped up, toned arms and avoid injuries.
Beginners need to know that muscle fibers are divided into fast and slow. The former are responsible for speed and strength, and the latter for endurance. Between them is sarcoplasm (intercellular fluid).
Fast fibers increase rapidly, but slow fibers do not. To stimulate the growth of the latter, you need to perform weight-bearing exercises with a minimum number of repetitions at a slow pace. With the maximum number of repetitions, the volume of sarcoplasm increases.
Thus, it will be difficult for a guy to make his arms more massive without dumbbells and a horizontal bar. You need to focus on heavy weight exercises, and use high-repetition training as an addition.
During exercise, an athlete can create a load using his own weight, but without heavy sports equipment he will not see rapid progress.
How to choose an elastic band?
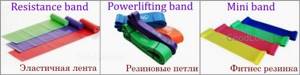
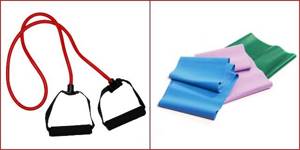
You can buy elastic tape in sports stores. In English it is called resistance band, latex band, theraband. In Russian you can find the following names: rubber band, shock absorber band, expander band, therapeutic band, theraband or Pilates band. Unlike tubular expanders, elastic bands are often found on sale in regular stores and even, as a rule, from several manufacturers.
Elastic bands have several levels of elasticity for people with different physical fitness. Typically there are three levels of resistance: soft, medium and hard, but some manufacturers may have five or even six levels of firmness. The tapes have a specific color depending on the resistance level. However, color coding may vary by manufacturer, so it is best to look at the specific product description rather than relying solely on color.
The following gradations are found:
- Yellow color: soft tape, lowest load level
- Red, green: medium load level
- Purple, lilac, blue color: rigid tape, high load level.
But we emphasize once again that color markings differ depending on the manufacturer, so it is better to look at the description of the specific product. Some online stores often sell bands of different colors, but the same resistance level. Sometimes entire sets of tapes with three levels of resistance are sold at once. Therefore, be sure to read the product description before purchasing it.
Choose a length of elastic tape that is at least 1.2 m, although they usually stretch well. However, the longer the band, the more varied exercises you can choose. In addition, a long tape can be folded in half, providing yourself with additional load. The average width of the tape should be 15-20 cm.
Like any other product, elastic band varies in quality depending on the manufacturer. Over time, the material from which the expander is made can wear out and lose strength, and this can reduce the effectiveness of exercise. The better the quality of the material, the longer it can serve you.

Elastic band or fitness band?
Nowadays, fitness bands, which are an expander ring and are a good addition to an elastic band, have become very popular. These elastic bands (mini band, resistance loop) are worn on the legs or arms and provide additional resistance when performing exercises. The fitness band is especially effective in combating problem areas on the hips and buttocks. If necessary, you can tie a long elastic band around your legs and thus replace the fitness band:
In modern strength and cardio training, fitness bands are often used. They provide excellent exercise for the upper and lower body, while being very functional. Elastic tape is used more when training the arms and back, as well as during Pilates and stretching. However, for more varied and high-quality activities, we recommend purchasing both an elastic band and a set of fitness bands. Both equipment will definitely be useful to you, especially since they are very affordable.
When choosing elastic bands and fitness bands, do not confuse them with rubber loops; these are slightly different sports equipment. It is designed for strength training and is very suitable for those who want to create a strong muscular body.
Elastic band or tubular expander?
In Western countries, tubular resistance bands are most often used for strength training, while elastic bands are more commonly used for Pilates and stretching. In Russia and the CIS countries, the tubular expander has not yet gained widespread popularity, which is why it can be so difficult to find in regular stores. In principle, for strength exercises, these two sports tools are interchangeable. But they still have differences.
Differences between a tubular expander and an elastic band:
- A tubular expander is more convenient during exercise due to the presence of handles; The elastic band can chafe your hands and even cause irritation.
- A tubular expander is less reliable than a tape: it breaks more often and wears out faster.
- An elastic band is more versatile when performing exercises because it does not have handles and is longer .
- The band is equally suitable for strength training, Pilates and stretching training. However, for strength training it is more effective to use a tubular expander.
- In Russian stores it is easier to find an elastic band than a tubular expander.
In the foreign segment, there are more ready-made video workouts with a tubular expander than with a tape. But you can also use an elastic band in such programs without much loss of effectiveness. See also: Top 12 strength training workouts with tubular resistance bands for the whole body.
What newbies face
The main question for beginners is how to quickly build up biceps? But, only troubles happen quickly! Any progress takes time. You can inject a pharmacological drug into the muscle, and for a while you will get ideal forms. But in the end, under the skin there will be just an elastic mass, not muscles. And if there is the slightest violation of sterility during the injection, there will be a large abscess instead of the biceps, and everything will end in surgical intervention.
Therefore, when looking for information about biceps, how to quickly pump up these muscles, etc., you should not pay attention to supposedly magical remedies. It is much wiser to cool your ardor a little and come to terms with a gradual but qualitative increase in mass. After all, we want to not only increase its volume, but also make it stronger, right?
This means that there is only one way left to achieve our goal - to swing on our own, using the maximum potential of our body.
The information below will help you make your biceps grow as quickly as possible naturally. At the same time, the advantages are obvious: the muscles retain their volume and shape longer after stopping exercise, there is no harm to the body.
The second problem that beginners face is overestimating their own capabilities at the initial stage. The guys are in a hurry, trying to lift heavy weights on their biceps. The technique is lost, the quality of the exercises tends to zero. Progress stops.
The third problem is the lack of technology. Ideally, it would be nice for a trainer to show you how to do the exercise correctly and watch you. To do this, you need to take personal training from him. But not everyone has this opportunity, and most people start training on their own.
Read more: Exercises for hamstrings in the gym and at home
Another problem on which we will end the list is the desire to have super huge biceps - like those of top bodybuilders. Let us repeat that this super-result can only be achieved through unnatural means and hours of daily training. Are you ready to live in the gym and stuff your body with drugs? Let's be a little more modest, you're the Hulk.
To solve all these problems, you need to be patient and study the exercise technique and the laws of working in the gym. Go!
Ready-made exercise plan with elastic band!
We offer you a ready-made exercise plan with an elastic band for the upper body (arms, shoulders, chest, back) and lower body (abdomen, hips, buttocks). You can alternate these two activities or combine them into one day if you have time.
Upper body workout
- Bicep curls
- Triceps extension
- "Butterfly" for chest muscles
- Diagonal fly for shoulders and chest
- Shoulder raises
- Shoulder press
- Belt row for back
- One-handed band pull
- Vertical row for the back
Perform each exercise for 12-15 repetitions in 3 sets. If the exercise is performed on the right and left hands, then do two approaches on each hand (four approaches in total). Rest between sets is 30 seconds, between exercises – 1.5-2 minutes.

Workout for the abdomen, legs and buttocks
- Squat + Leg abduction
- Walking with tape to the side
- Taking the leg back while standing
- Gluteal bridge
- Bridge leg raises
- Bicycle for stomach and legs
- Side leg raise
- Taking the leg to the side
- Taking the leg back
Perform each exercise for 12-15 repetitions in 3 sets. If the exercise is performed on the right and left legs, then do two approaches on each leg (four approaches in total). Rest between sets is 30 seconds, between exercises – 1.5-2 minutes.

How to pump up biceps at home?
Let's face it: it is impossible to build impressive biceps at home; for this you need some kind of sports equipment, at least dumbbells. In this article we will learn how to train biceps using improvised methods. You won’t pump up the 50 cm “cans”, but you will maintain the current shape. If you have never trained and are just starting your sports journey, then today’s biceps workouts will be very effective for you.
To understand how to pump up your biceps at home, you need to know what this muscle is responsible for. We need the biceps for two actions: raising the arm and turning the hand. Our training will be based on this functionality.
Biceps curl
We will need a backpack (bag) and a towel. You need to stuff the backpack with something heavy, then take a towel and thread it through the top handle. Now we grab the towel so that our palms face each other. Next, we begin to perform biceps curls, as shown in the video.
The exercise must be done smoothly, without jerking. I recommend doing 3-5 sets of 10-15 repetitions.
Concentrated biceps curl
The exercise looks funny, but it will effectively help support your muscles during quarantine. You need to sit on a chair and put your left hand under your right leg. Now lift your leg with your hand as high as possible and lower it as slowly as possible. Below is a video of the exercise:
The same must be done with the other hand. I recommend doing 4-5 sets of 20-25 repetitions.
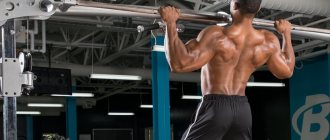
Reverse grip pull-ups
Reverse grip pull-ups are the most effective exercise for training biceps with your own weight. You need to grab the bar shoulder-width apart with a reverse grip (palms facing you). Next, pull yourself up so that your chin goes over the bar.
I recommend doing pull-ups as many times as possible in 3-4 approaches. During the exercise, you should not help yourself with jerks and swings.
Rotate the brush
We remember that the biceps is responsible for raising the arm and turning the hand. This exercise will help us work our biceps more deeply. You need to take a bottle of water or something heavier, bend your arm 90 degrees and start rotating your hand: clockwise, then counterclockwise.
You can do one approach on each arm, but you need to do it “to failure.”
Well, for now, I advise you to go to the “workouts” section and get acquainted with the most effective home workouts. Also visit our culinary website: crazykulinar.ru and learn recipes for healthy and tasty dishes
Thank you for your attention!
Views: 1,370
Buy elastic tape inexpensively
A lot of different and inexpensive expanders are sold in the Aliexpress online store. By purchasing an elastic band, you will have the opportunity to do a variety of workouts at home very efficiently and effectively.
We have selected the most popular stores on Aliexpress with a large number of orders, high average ratings and positive reviews. The price of almost all the presented tapes is in the range of 200-400 rubles. Store links will open in a new window.
Elastic band 150 cm
The length of the tape is 150 cm, the width is 10-15 cm. The color and cost of the tape depends on the width and thickness. The thicker the tape, the greater the resistance. Made from natural latex. Cost 150-300 rubles.
Elastic band 150-180 cm
The length of the tape is 150-180 cm, the width is 15 cm. The tension of the tape is from 10 to 20 kg depending on the color (the seller indicates pounds). Made from natural latex. Cost 150-300 rubles.
Creativity
Exercises with weights were performed long before the invention of modern sports equipment, so if it is not possible to purchase the necessary sports equipment, you should approach training creatively.
This is easy to do, given that the question of how to properly pump biceps at home, even with a non-standard approach, has at least two options.
The first option is to use thick books like old dictionaries or encyclopedias. You can fill a backpack with them or make bundles, the main thing is to make them comfortable to hold.
The second option is to follow the example of the ancient karatekas, who raised “game”, special jugs filled with water, sand or stones.
In modern realities, you can similarly lift plastic containers, filling them to the desired weight.
Simple exercises for osteoarthritis
The simplest way to treat congenital dysplasia and initial damage by deforming arthrosis is physical therapy (PT) of the hip joint. A simple (basic) set of daily exercises stabilizes the affected cartilage tissue of the articular surfaces.
Exercises while lying on your stomach:
- slowly raise your straight leg up with a delay of 3-5 seconds, then slowly lower it down until completely relaxed. The same is done with the other leg. The main task of such therapeutic and preventive action is to pump up the thigh muscles without disturbing the hip joints;
bend the knee and alternately slowly lift the right and left limbs, still holding the movement for 3-5 seconds. The purpose of this exercise for the hip joint is to stabilize muscle functions and restore blood supply.
Position taken - lying on your back:
- Bend one leg at the knee and keep the other straight. Slowly raise the straightened leg up with a delay of a few seconds, then lower it until completely relaxed. The same movements are performed with the other leg;
- bend both legs at the knee joint at an angle of 90º, smoothly direct them towards the stomach without touching it. We lower our legs and relax;
- Bent legs at an angle of 90º should be slightly spread slightly wider than the hip area. Slowly raise the pelvis, bending as high as possible, holding the position for 3-5 seconds. Slowly lower the pelvis, trying not to touch the floor surface.
On the subject: Shoulder extension with dumbbells while sittingThe following gymnastic approach is performed lying on your side:
one limb is relaxed and bent at the knee, the other is straightened. Slowly raise the straight leg up to 45 degrees, and holding it in the air a little, smoothly lower it down. Do not perform the exercise too abruptly to avoid tearing the articular tendon;
Starting position - sitting:
- slowly lean forward, wrapping your hands around your toes. You need to stay in this position for a few seconds. If it is impossible to reach your fingers due to the physiological characteristics of the body or physique, you should not overexert yourself, but simply use a towel, draping it over your legs like a noose.
When performing exercises, you should not strain other muscles of the body. Only the muscles of the limbs should work. Each exercise is repeated at least 5 times.
Strengthened set of exercises
When the joint has already been developed and basic exercises can be performed easily, it is recommended to perform physical exercises for pain in the hip joint with increased load.
- Place your healthy leg on the bench, your hands should be placed on the support. The affected leg needs to swing forward, backward and to the sides, smoothly pulling itself towards the stomach.
- You need to get on all fours. Extend your limbs one by one, holding the weight for a few seconds. Once you have mastered the movements, you can add a weight cuff.
- You need to lie on your stomach, lower your arms along your body. Imitate crawling movements in this position.
Exercises at the initial stage of the disease
If you start doing exercises for the hip joint at home as early as possible, you can prevent the development of the disease and inflammation of the joints at an early stage. Doctors often prescribe the following movements:
- You need to sit on the floor and spread your legs out to the sides as much as possible. Bend the affected limb at the knee and tilt it inward with gentle rocking movements.
- Bend your leg at the knee joint, grab your heel tightly with your hands and gently pull it towards your armpit.
- After these movements, you need to perform swings and legs in a relaxed state.
At the end of the gymnastics, doctors advise massage of the lower extremities for five minutes. Then the affected joint should be lubricated with warming ointment or gel.
Rules for performing therapeutic exercises
The main thing that must be observed when performing exercises is smooth and unhurried movements. Snatching efforts will cause microtrauma or other damage to the joints and will bring absolutely no benefit. Slow, moderate gymnastic movements allow you to create a certain wave of blood, which progressively washes the articular surface, improving the delivery of nutrients. Slow movements allow you to efficiently flush out decay products from the body.
Proper breathing patterns play an important role. You need to breathe only through your nose. Even a correctly performed set of exercises will not improve the situation in the next 2-3 weeks. A person will feel the first signs of improvement in his condition after a month of daily training.
If the proposed exercises cause sharp or acute pain in any of the vital organs, then physical therapy should be stopped.