Before you start the program you need to take a test. The test, as it is logical to assume, is based on push-ups. You need to do the maximum number of push-ups at one time. Let it be 7 or 12 push-ups, but it will be fair.
You can watch the technique of doing push-ups in the video below:
Based on the data from this test, you can determine your level of fitness in this movement by correlating it with the data from the table below:

After this test, it is better to rest for 2-3 days and “not rush into battle.”
Example of a push-up program for beginners

At the initial stage, you need to set aside 3-4 days a week for classes. Even if you plan to do push-ups every day, it's best to do push-ups only every other day at first. This is necessary so that the muscles have time to recover and rest. Beginners are advised to create a monthly plan from which further changes can be made. We bring to your attention one of the sample pans for training at the entry level, which is presented in the table.
| First week | Warm-up | 10 minutes |
| 1 set | 5 to 8 push-ups | |
| Break | 1 minute | |
| 2 sets | We reduce the number of push-ups by 2 times from how many were in the 1st approach | |
| Break | 1 minute | |
| 3 sets | 5 times | |
| Break | 5 minutes | |
| 4 sets | 5 times | |
| Do 2 more sets of 5 repetitions with a minute rest | ||
| Second week | Warm-up | 10 minutes |
| 4 sets of 8 times | With pauses of 1 minute | |
| Third week | Warm-up | 10 minutes |
| 4 sets | With maximum load | |
| Rest between sets | 1 minute | |
| Fourth week | It is the final one in this training program. During this period, it is necessary to increase the number of push-ups in each set. |
Third week of training
So, you are stronger than you were at the beginning of the journey, and the test you took at the end of the second week objectively shows this.
Remember his results?
- If you did 16-20 push-ups in your last test, the first column in the table below is yours.
- 20-25 push-ups - second column.
- More than 25 push-ups? Cool! Third column.
It may happen that for some reason you did not become “stronger” and did less than 16 push-ups. The reasons may be different, but you should not despair. Just repeat “week two” again. You will succeed!
Table . Third week of training
Fourth week of training
Practice in the same “column” as in the third week. At the end of the week you will have another endurance test. As usual, you will need to remember the test data, your fifth training week will depend on it.
Table. Fourth week of training
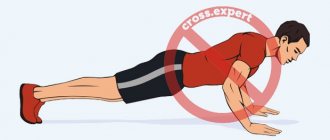
// How to do push-ups correctly?
Push-ups are one of the key functional exercises for training the chest muscles. Note that when push-ups are performed correctly, the muscles of the arms (primarily the triceps), as well as the abdominal press, muscles of the upper back and shoulders are actively involved in the work.
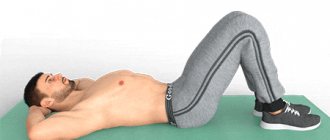
In order to learn how to do push-ups correctly, you first need to strengthen your core muscles. The best exercise for this would be the plank with outstretched arms - in fact, it repeats the starting point of chest push-ups. The only difference is that you don't need to make the movement.
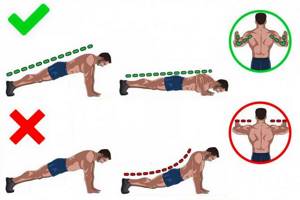
Among other things, correct push-ups imply a fairly wide position of the arms - the elbows should be at an angle to the body, and not located in a line. This will take pressure off the shoulder joints while increasing chest muscle recruitment.
// Correct push-ups - briefly:
- the abs are tense and the stomach is slightly retracted
- at the bottom of the exercise the back is straight
- placing your hands at chest level, not shoulders
- push-up program for beginners
- how to pump up your breasts quickly?
- plank - how to do it right?
Chest push-ups - types
Push-ups are a variable exercise. When using a footrest (in this case, the head is below the level of the body), you train the upper chest. If the stand is located under the arms (the head is higher than the body), the main load of push-ups falls on the lower pectoral muscles.
advertising is not displayed
Among other things, you can vary the width of the placement of your palms on the floor. With a wide hand position in push-ups, additional load falls on the upper back and shoulder girdle, and with a narrow position, when the elbows almost touch the body, on the triceps muscles.
About the book[edit | edit code]
Without focused effort and disciplined execution of a plan, achieving improved fitness is impossible. After an initial test to determine your fitness level, this book will help you successfully overcome all the challenges of a seven-week program, at the end of which you will feel like a new person. Hundreds of people just like you have already gone through this program and have been amazed at the results. All you need is a desire to succeed, strong determination and some time to practice.
This book is divided into four parts, each with a specific purpose.
PART 1 provides an overview of the seven-week program, how to properly perform push-ups and their effectiveness, and the benefits of following a structured training program. Here are testimonials from those who have successfully completed the program, answers to common questions, and steps to take before starting the program.
PART 2 contains six different training plans: two ten-week beginner programs, two seven-week intermediate programs, and two seven-week advanced programs. Plus, it provides an easy-to-follow fitness plan that will help you stay at the peak of your newfound strength. In PART 3, you will learn about several alternative types of push-ups that may be of interest to those who have mastered the traditional technique and are ready to try more advanced variations.
Scattered throughout the book are informational inserts about record breaking achievements in the field of push-ups.
Do you think 100 push-ups is cool? On October 5, 1965, Chuck Linster performed 6,006 push-ups in a row. On February 5, 1976, Robert Llewim Knecht improved his achievement by performing 7026 push-ups; A year later, on September 1, 1977, Henry Marshall completed 7,650 push-ups. In October 1980, Japan's Minoru Yoshida surpassed them all by performing 10,507 push-ups without stopping.
How to do push-ups correctly?

To learn how to do push-ups correctly, you must first learn to hold the plank with your arms outstretched for at least 40-50 seconds. After this, move on to push-ups on your knees, trying to do them slowly, tensing your abs and trying to feel the muscles of your chest, shoulders and triceps working.
At the same time, there is no need to chase an increase in the number of repetitions - ultimately, this forces you to do push-ups too quickly, which harms the technique. Several sets of correct push-ups will be more effective than 20-30 done with poor technique.
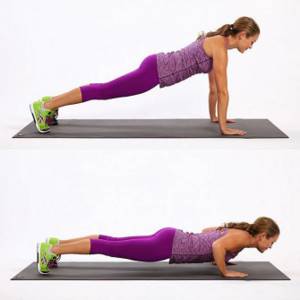
Step-by-step push-up technique
Correct push-ups imply the conscious involvement of the core muscles in the work and the division of the movement into three phases:
1. Plank with outstretched arms. Initial position. Shoulders pressed to the body, shoulder blades slightly retracted, chest facing forward, gaze down, neck in a neutral position. The body seems to be elongated in a straight line, the toes and tailbone stretch back. Do not lift your pelvis too high and do not lower it too low.
2. Downward movement. As you inhale, slowly lower yourself down, trying to feel the muscles of your chest and arms working. Hold for one to two seconds at the bottom, tensing your abdominal muscles. Make sure to keep your back straight and your body in a straight line.
3. Moving up. As you exhale, push your hands off the floor and slowly (in 2-5 seconds) lift your body up as much as possible, returning to the starting position. During this phase you should also feel your triceps, shoulders and upper back working.
Partial push-ups[edit | edit code]
Partial push-ups
ExecutionEdit | edit code
While kneeling, place your arms in front of you and straighten your legs. Arms are straightened, shoulder-width apart, clearly under the shoulders. Feet together. The back, knees, legs and head should form a straight line. Slowly bending your elbows, lower yourself to about half arm height until the bend of your elbow forms a right angle. To figure out how deep to go, place a basketball or soccer ball under your hips. This will be the starting position (Fig. 7). Bend your elbows until your hips lightly touch the ball (Fig. 8). The ball is a great indicator of the bottom of the exercise. Hold for a second and slowly return to the starting position. Repeat.
Exercise in cut open | edit code
Partial push-ups are important exercises for developing technique and strengthening muscles. Many people make a lot of mistakes, bending their knees and lifting their butts up - all this is a sign of weak back and abdominal muscles. By keeping your hips straight and tensing your abs, you are training your abdominal and back muscles.
Training normedit | edit code
| First level | 1 series of 8 repetitions |
| Average level | 2 series of 12 repetitions |
| Advanced level | 2 series of 25 repetitions |
Improving technologyedit | edit code
If you cannot perform partial push-ups, reduce the range of motion. Place the ball under your knees rather than under your hips. Lower yourself down on your hands until you touch the ball - this is about a quarter of the required push-up depth. Once you can do more than ten push-ups, move the ball closer to your hips and gradually move the ball until you can masterfully perform partial push-ups with the ball under your hips.
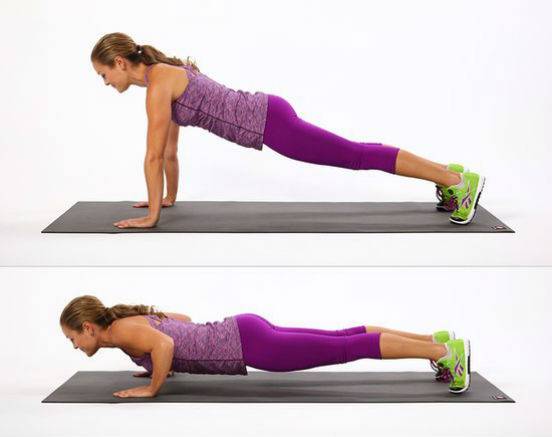
How to do push-ups correctly
Stand in a prone position. Place your wrists under your shoulders or half your palm wider. Pull your stomach in and tighten your buttocks. Direct your gaze to the floor in front of you.
Bend your elbows and lower yourself down. Make sure that the angle between your body and shoulder is no more than 45 degrees.
If you push your elbows out to the sides, you put more stress on your joints, which can lead to inflammation and pain if done over and over again.
Push yourself up to the starting position. Make sure that the body remains level, the pelvis does not go down, and the lower back does not collapse.
To test your push-up range, have someone place their fist on the floor under your chest. You should lower yourself until your chest touches your fist. Remember this position and do it in the full range every time - half push-ups will steal your progress.
Alternatively, you can release until your chest touches the floor. This way you will load your muscles more and will not doubt every time whether you are working at full amplitude.
Do push-ups at a calm pace, no need to rush. Fast push-ups overload the Effect of Push-up Speed on Elbow Joint Loading elbow joints and can cause pain.
If you are not yet able to perform classic push-ups with the correct technique, do a simplified version - from your knees.
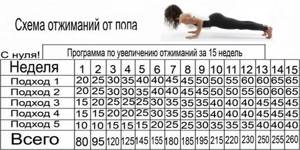
Example of a push-up program for beginners
You need to train according to this table every other day. The numbers indicate the number of repetitions in the approach, the sign “—” rest between approaches. The rest time is arbitrary, but try not to rest longer than necessary to regain your breathing.
- You can start the approach with classic push-ups, and continue from your knees or from the wall. When the circuit ends, repeat the last day, performing more and more repetitions from the floor.
- You can go through the entire circuit against the wall, then the entire circuit from your knees, then the entire circuit from the floor.
| Day | Women's program |
| 1 | 2—2—2—2—3 |
| 2 | Rest |
| 3 | 4—3—2—2—4 |
| 4 | Rest |
| 5 | 5—4—4—3—5 |
| 6 | Rest |
| 7 | 4—5—4—4—5 |
| 8 | Rest |
| 9 | 6—5—3—4—6 |
| 10 | Rest |
| 11 | 5—6—4—5—6 |
| 12 | Rest |
| 13 | 9—8—10—8—10 |
| 14 | Rest |
| 15 | 13—10—11—11—10 |
| 16 | Rest |
| 17 | 15—11—14—10—11 |
| 18 | Rest |
| 19 | 20—14—14—12—15 |
| 20 | Rest |
| 21 | 14—12—12—10—13 |
| 22 | Rest |
| 23 | 18—11—13—12—13 |
| 24 | Rest |
| 25 | 21—18—14—13—19 |
| 26 | Rest |
| 27 | 18—11—13—12—13 |
| 28 | Rest |
| 29 | 14—11—11—9—13 |
Below we present a push-up program for men, it is also designed for a month.
| Day | Program for men |
| 1 | 6—6—5—4—5 |
| 2 | Rest |
| 3 | 8—8—6—5—7 |
| 4 | Rest |
| 5 | 9—8—8—5—9 |
| 6 | Rest |
| 7 | 8—7—5—4—6 |
| 8 | Rest |
| 9 | 10—8—6—7—9 |
| 10 | Rest |
| 11 | 9—9—7—7—9 |
| 12 | Rest |
| 13 | 13—10—9—12—10 |
| 14 | Rest |
| 15 | 15—15—13—13—10 |
| 16 | Rest |
| 17 | 20—14—14—12—15 |
| 18 | Rest |
| 19 | 14—12—14—12—15 |
| 20 | Rest |
| 21 | 20—12—14—13—16 |
| 22 | Rest |
| 23 | 20—17—14—15—18 |
| 24 | Rest |
| 25 | 22—21—16—20—22 |
| 26 | Rest |
| 27 | 13—12—10—8—25 |
| 28 | Rest |
| 29 | 10—10—8—7—28 |
Train regularly - and in a month you will be able to do 30-40 push-ups!
The 21-Day Perfect Push-Up Marathon
Instructions
Find a position or support that allows you to perform ideal push-ups at your skill level. Break the total number of repetitions into as many sets as needed. The main thing is to maintain ideal - literally ideal - body position in one line and impeccable technique. I recommend starting with a relatively low number of repetitions so that you can safely progress towards your goals.
Remember, if your lower back is sagging and your neck and trapezius muscles are doing all the work, it is not considered a proper push-up. If you do push-ups with this technique, you are teaching yourself a movement pattern that does more harm than good. These push-ups don't count! Find someone who can give you an honest assessment of your technique, and don't be afraid to hear the truth.
Once you feel strong and can perform push-ups flawlessly, try lowering your fulcrum or find a more challenging variation of the exercise that will challenge you for several reps per set. You can break the reps into as many sets as needed.
Week 1. Week of “entry” push-ups
Example:
use a high support
- Day 1:
4/3/3/2=12 - Day 2:
5/4/3/2=14 - Day 3:
5/5/4/2=16 - Day 4:
Rest - Day 5:
6/5/5/3=19 - Day 6:
7/6/5/3=21 - Day 7:
Rest
Week 2: Moderate push-up week
Example:
Use low support or more complex advanced options
- Day 8:
4/3/3/2=12 - Day 9:
5/4/3/2=14 - Day 10:
5/5/4/2=16 - Day 11:
Rest - Day 12:
6/5/5/3=19 - Day 13:
6/5/5/4=20 - Day 14:
Rest
Week 3. Week of difficult push-ups
Example:
do push-ups from the floor or choose more difficult push-ups
- Day 15:
4/3/2/1=10 - Day 16:
4/3/2/2=11 - Day 17:
4/3/3/2=12 - Day 18:
Rest - Day 19:
5/4/3/2=14 - Day 20:
Rest - Day 21:
Compare the number of push-ups with what you started with, or see if you were able to achieve your goals. For example: 30 push-ups at a time, or 1-2 push-ups on one arm.
Perform push-ups carefully and do them correctly. Over time, this approach will become a habit, and you will do push-ups exclusively with perfect technique.
How to master the exercise from scratch
Even after doing various types of fitness, your arms may still be weak. Push-ups can be one of the best exercises for strengthening your arm muscles. Personally, my first push-up was not the most successful, because I tried to do the classic version right away.
As a result, the cheerful start ended with me simply collapsing on the floor and being unable to get up again. In fact, this is not where we should have started at all. I suggest you do everything consistently, without extreme stress and injury.
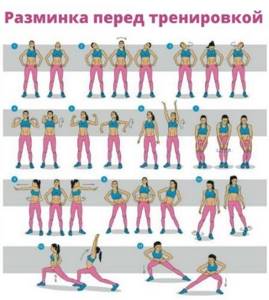
Therefore, experts advise beginner girls who have very weak chest and arm muscles to try simplified push-ups. Only before this there is a mandatory warm-up, this can be lifting and lowering, spreading your arms in different directions, circular movements, bending the body. And at the end - light stretching.
Let's look at simplification in a little more detail.
- Wall push-ups.
The advantage here will be the independent regulation of the load; the further you stand from the wall, the more difficult it is; the closer you are, the easier it is. To perform a push-up, stand near a wall one long step away. Raise your arms and place your palms against the wall at chest level.
Now we do push-ups, simply bending our elbows at the joints and touching the surface of the wall with our forehead. Don't forget that the torso is one straight line. We do everything slowly and smoothly. Try this 10 times. Over time, progress by increasing the incline angle and reach a total of 20-30 times.
Chair push-ups.
If you succeeded in the previous version, go to the next level. Here, a chair, sofa, bench, table or window sill can serve as a support for your hands. The higher the surface, the easier it will be to perform.
When performing this option, rest your palms on a horizontal, elevated surface, placing them shoulder-width apart. Straighten your elbows. Now start doing push-ups, that is, bending your elbows, be sure to watch your pelvis so that it doesn’t bend anywhere. If you do it 20-30 times without problems, move on to the next complication.
Knee push-ups.
This variation is already more similar to the classic one, but it is 50% easier to perform. In it, you take the starting position and bend your knees, leaving your shins on the floor, this will reduce the load on the joints.
You don’t raise your pelvis, but you don’t lower it either, your arms are straightened at the elbows, with your palms on the floor shoulder-width apart. Now you start doing push-ups as in the classic version. As soon as you can easily perform 20-30 push-ups, then switch to the traditional version.
You can also use these recommendations when teaching your children to do push-ups. The main thing is to monitor the position of the body so that the child, from school age, learns to perform the exercise correctly.
Features of technology for girls
Instead of balancing on your toes, girls at the beginner level can do push-ups from their knees.
With this execution, the level of load on the arms is reduced by approximately half, and it becomes easier to control the position of the back when performing the exercise and to push off the floor.
Try not to drop your hips down as you push out. If your lower back starts to hurt while doing push-ups, stop and take a break. If your wrists hurt after exercise, try doing push-ups on your fists or use special push-up supports.
If you do not have enough physical fitness and it is difficult to do horizontal push-ups, increase the height of your arms. As the muscles strengthen, it will be possible to lower the level of the arms.
- Your hands can be placed on the bench, thus pushing off from the bench, and not from the floor.
- The easiest level: stand against a wall at arm's length. Place your hands on the wall at shoulder level and push away from it, transferring the weight of your torso to your hands.
Push-up program for the beginner athlete
Monday
- Wide grip push-ups 4 x 12-15;
- Deep push-ups on chairs 2 x 12-15.
Wednesday
- Narrow grip push-ups 4 x 12-15;
- Clapping push-ups 4 max.
Friday
- Narrow grip push-ups 3 to 12-15;
- Wide grip push-ups 3 x 12-15;
- Deep push-ups on chairs 2 x 12-15.
At the end of each workout, if you have strength left, you can learn push-ups on one hand, on your fingers, or against the wall. The main thing is to be careful not to overload the muscles and ligaments. Every workout should start with a warm-up. Rotational movements and swings are perfect.
Don't forget about your abs and lower back to keep your spine healthy. We work the abs with crunches, and the lumbar muscles with the boat exercise. Stretch after your workout
Pay special attention to the chest muscles so that they do not spasm and pull your shoulders forward. If you neglect to stretch the pectoral muscles, then problems with posture and subsequent complications will arise.
The training program described above is also suitable for girls, but with a few differences. There is no need to use additional weight. If you can’t do push-ups from your feet, do the exercise from your knees. Pull-ups will strengthen your arm muscles and tighten your chest.
The push-up training program is not complete, but you still need to recover. Good sleep and proper nutrition are a must.
You won't be able to build Arnold Schwarzenegger's body with push-ups alone, but you have to start somewhere. Push-ups will serve as an excellent base for subsequent workouts. The main thing is not to dwell on them for a long time. After several months of training according to the program described above, add other bodyweight exercises. If it gets too long, welcome to the gym!
Frequently asked questions about the course
Is it possible to train more than three times a week?
Exercising more than three times a week is not recommended due to the fact that muscles need time to recover. It usually takes 1–2 days. Therefore, training every other day is ideal. But, if you are physically well prepared and feel strong, you can increase the number of workouts to 4-5 times a week.
How long should the break be between each set?
Optimally, the pause between approaches should be from 60 to 90 seconds. If this time is not enough for you to recuperate, you can increase your rest. But don't take a break for more than three minutes. Then it will be difficult to get involved in work.
I couldn’t complete the required number of push-ups, what should I do?
Dont be upset. Nothing wrong with that. It can be quite difficult to complete all the push-ups the first time. Take a break and rest well for a few days. And with renewed vigor, begin to go through the same week. You will succeed.
httpv://www.youtube.com/watch?v=embed/3GWmEtPDQjU
I have reached the end of the program and can do 100 push-ups in one set, what should I do next?
Congratulations! You did your best. If you further want to develop your endurance and build muscle mass, we recommend moving on to push-ups with additional weights. You can use a heavy backpack or weight plates as a weighting agent. You can also try learning leg-up push-ups, one-arm push-ups, or plyometric (jumping) push-ups. It is not necessary to start the program from the very beginning; you can start immediately in the third or fourth week.
Is it possible to combine this program with programs of 50 pull-ups, 200 abs, 200 squats and others?
It is possible to perform these programs in parallel, because they load different parts of the body: squats - leg muscles, horizontal bar - back muscles, abs - abdominal muscles. So feel free to combine them into one workout if you are physically well prepared. First, perform the exercises of one program, then rest for 10-15 minutes and proceed to the next program.
httpv://www.youtube.com/watch?v=embed/Qh1nWjj8rW0
Are there any contraindications to this program?
Before starting this course, it is not necessary to consult a doctor. But you should still assess your health status yourself. If you do not have recent injuries, problems with joints and muscles, with the circulatory and respiratory systems, nothing will stop you from achieving your goal of 100 push-ups. People with third-degree obesity may face difficulties. It will be very difficult for them to do push-ups. First you need to get rid of excess weight.
Can I reach 1 thousand push-ups in one trip using this program?
Not everyone can do 1000 push-ups in one set. But judging by the world records, which reach 10,000 push-ups, we can say that anything is possible.
So, if you want 100 reps per set, our program will help you with this. Even if everything doesn’t work out so smoothly for you, don’t stop, go towards your goal. Listen to your body and gradually increase the load. And if, on the contrary, the workout seems too simple and boring to you, diversify it with more complex push-up options. For example, instead of standard push-ups, do either fist push-ups, reverse push-ups, clap push-ups, or one-arm push-ups.
Good luck with your training. Always be in great shape!
httpv://www.youtube.com/watch?v=embed/tKYtZnK0N2k
Example program for advanced level
For experienced athletes, a training program should be drawn up for every day. In this case, one program should not be worked on for more than a month. The main emphasis for the advanced level should be aimed at maximizing the development of a large muscle group, the formation of relief and a strong, healthy and beautiful body.
Sample plan:
- 1 day. Be sure to warm up and smoothly transition to push-ups. 15 push-ups, 4 sets. Exercises are performed with weights and with a narrow grip. You can alternate these exercises with push-ups: 1 set of 50 times.
- Day 2. After warming up, perform a random exercise 100 times. The break can be no more than 2 minutes.
- Day 3. Perform push-ups with a wide grip and a medium grip as many times as possible. During breaks, abdominal exercises are done.
- Day 4 Deep push-ups – 3 sets of 20 reps and close-grip push-ups – 3 sets of 12 reps. During breaks, perform squats - 3 sets of 30 times.
Adjustments can be made to the program depending on individual characteristics and the goal.
To speed up muscle building, it is important to follow a proper diet. It should include carbohydrates and proteins. At the same time, it is best to eat lean meat, prepared in the correct way: without frying, smoking or using trans fats.
You should also give up high-calorie sauces and fast food.
How to learn to do push-ups correctly?
Two main points in the correct push-up technique: first, you should feel the work of the pectoral muscles, and if you do not feel it, then start by doing vertical push-ups against the wall, trying to “catch” the feeling of the muscles working.
Secondly, when doing push-ups, control your abs and keep your gluteal muscles tight.
Although this is much more difficult, it is critical for distributing the load and maintaining a straight torso without arching your back.
Errors in performing the exercise
Purely technical errors in push-ups include the position of the eyes (you should look slightly ahead of you, not vertically down), as well as the position of the palms and the arch of the wrists (be careful not to curl them too much).
All other mistakes are associated, first of all, with insufficient muscle development and the lack of strength necessary to perform the exercise - do not strive to perform a large number of “bad” push-ups, it is better to do a few, but technically correct ones.
***
Due to its simplicity and effectiveness, push-ups are one of the oldest physical exercises. Learning to do push-ups is not that difficult, the main thing is to follow the technique and not just try to achieve a “big number”.
- Pushup, Athlipedia article, source
- Push Up Board, source
- How to do a proper pushup, source
Tips for Beginners
Despite the apparent simplicity of the exercise, most people make mistakes. The tips described below will help you avoid mistakes and train push-ups correctly. Such tips include:
- Train push-ups two to three times a week to give your muscles time to recover.
- Don't stop at push-ups; add other exercises over time so that your body develops harmoniously.
- Don't chase the result by distorting the technique. Less is better, but right.
- Do not neglect warming up, especially the shoulder, wrist and elbow joints.
- Do different types of push-ups, don't focus on just one.
- Don't rush to complete the approach quickly. Hold your breath, so you can give your best.
- Train your abs to spend less effort holding your body in the correct position.
- If you feel strong, use additional weights. A backpack is perfect for these purposes, in which you can put discs for barbells, dumbbells or a bottle of water.
- You don’t need to perform every approach to the maximum, otherwise the muscles will not have time to recover before the next workout. Instead of muscle fibers growing, their destruction will begin.
- Don't chase quick results. It is better to tune in to long work, then success is inevitable.
Select your skill level
Beginner (up to 5 push-ups) Intermediate (6–10 push-ups) Above intermediate (11 or more push-ups)
| Day | Approaches | Total |
| 1 | 2 3 2 2 3 | 12 |
| 2 | 3 4 2 3 4 | 16 |
| 3 | 4 5 4 4 5 | 22 |
| Day | Approaches | Total |
| 1 | 4 6 4 4 6 | 24 |
| 2 | 5 6 4 4 7 | 26 |
| 3 | 5 7 5 5 8 | 30 |
| Day | Approaches | Total |
| 1 | 10 12 7 7 9 | 45 |
| 2 | 10 12 8 8 12 | 50 |
| 3 | 11 13 9 9 13 | 55 |
| Day | Approaches | Total |
| 1 | 12 14 11 10 16 | 63 |
| 2 | 14 16 12 12 18 | 72 |
| 3 | 16 18 13 13 20 | 80 |
| Day | Approaches | Total |
| 1 | 17 19 15 15 20 | 86 |
| 2 | 10 10 13 13 10 10 9 25 | 100 |
| 3 | 13 13 15 15 12 12 10 30 | 120 |
| Day | Approaches | Total |
| 1 | 25 30 20 15 40 | 130 |
| 2 | 14 14 15 15 14 14 10 10 44 | 150 |
| 3 | 13 13 17 17 16 16 14 14 50 | 170 |
| Day | Approaches | Total |
| 1 | 6 6 4 4 5 | 25 |
| 2 | 6 8 6 6 7 | 33 |
| 3 | 8 10 7 7 10 | 42 |
| Day | Approaches | Total |
| 1 | 9 11 8 8 11 | 47 |
| 2 | 10 12 9 9 13 | 53 |
| 3 | 12 13 10 10 15 | 60 |
| Day | Approaches | Total |
| 1 | 12 17 13 13 17 | 72 |
| 2 | 14 19 14 14 19 | 80 |
| 3 | 16 21 15 15 21 | 88 |
| Day | Approaches | Total |
| 1 | 18 22 16 16 25 | 97 |
| 2 | 20 25 20 20 28 | 113 |
| 3 | 23 28 23 23 33 | 130 |
| Day | Approaches | Total |
| 1 | 28 35 25 22 35 | 145 |
| 2 | 18 18 20 20 14 14 16 40 | 160 |
| 3 | 18 18 20 20 17 17 20 45 | 175 |
| Day | Approaches | Total |
| 1 | 40 50 25 25 50 | 190 |
| 2 | 20 20 23 23 20 20 18 18 53 | 215 |
| 3 | 22 22 30 30 25 25 18 18 55 | 245 |
Is it possible to train more than 3 times a week?
Your muscles need time to recover, usually 1-2 days, so exercising more than 3 times a week is not recommended.
However, if you are an experienced athlete and feel strong, you can increase the frequency of training to 4-5 per week.
How long should the break be between sets?
Try to rest no more than 60-90 seconds, but if you don’t have enough time to recuperate, you can increase the rest to three minutes.
I couldn’t complete all the planned push-ups, what should I do?
It can be quite difficult to do all the push-ups the first time, don’t despair, there’s nothing wrong with it. Take a break, rest well for a few days, and then try to get through the same day with renewed vigor, everything should work out for you.
I have completed the program and can do 100 push-ups, what should I do next?
Our congratulations! If you want to further develop muscle strength and endurance, move on to push-ups with additional weights. A weight plate or a heavy backpack can serve as a weight. You can also try elevated push-ups, plyometric push-ups, or one-arm push-ups. In this case, the program does not have to start from the beginning; you can start from the third or fourth week.

Useful tips and tricks
As with any other exercise, it has its own characteristics and nuances. If you follow them, this will increase the effectiveness of push-ups. During the implementation process, it is recommended to adhere to the following rules:
During the movement, the back should be straight, without arching in the lower back or protruding the buttocks. Since this greatly disrupts the technique and reduces efficiency. All movements must be measured and controlled. There is no need to be harsh. Try to raise and lower your body using the muscles of your arms and chest
This will allow you to feel their maximum performance at different points. During the exercise, the shoulder blades should not be brought together. In the upper position, you need to fully straighten your arms and hold for 1-2 seconds for better muscle contraction. If you feel discomfort or pain during the exercise, then you should stop it. Pay attention to proper breathing, as this will be useful when working in the classic push-up variation. If you experience pain in your wrists, they should be massaged regularly to relieve pain and ease spasms. Don't forget to warm up before starting the exercise.
Juarez Valley Method
They say that prisoners in the Mexican Juarez Valley prison (by the way, one of the most dangerous prisons in the world) used this exercise scheme.
Choose an exercise. During each cycle you will do only one exercise. Let's say push-ups.
The cycle consists of 20 sets. The repetition scheme looks like this:
- set 1 - 20 repetitions;
- set 2 - 1 repetition;
- set 3 - 19 repetitions;
- set 4 - 2 repetitions;
- set 5 - 18 repetitions;
- …
- set 19 - 11 repetitions;
- set 20 - 10 repetitions.
That is, for the first odd number you give 20 repetitions and with each new odd number you reduce the number of repetitions by 1. With even numbers it’s the other way around: you start with 1 repetition and with each new number you increase their number. A total of 210 repetitions.
Between sets, take 5-10 steps to rest, then return to the exercises. The goal is to complete the cycle as early as possible.
Push-up variations
There are a huge variety of complicated and specific options that allow you to increase the load and (or) distribute it to certain muscle groups, joints, and achieve this or that effect. Let's look at just a few of them.
The distribution of weight and load depends on the position of the hands and the position of the body relative to the horizon
In the standard position, the hands are placed shoulder-width apart, and the load is distributed evenly.
Push-ups with different hand positions
- Wide push-ups - with arms spread wide apart. If you place your hands wider than your shoulders, the load on the deltoid muscles and the outer part of the pectoral muscle increases.
- Push-ups with a narrow emphasis (the hands are located under the shoulders). If the distance between the arms decreases, the emphasis of the load shifts towards the triceps and the inner part of the pectoral muscle.
When doing push-ups with a narrow arm position, moving your arms back (toward your legs) shifts the load from the triceps to the deltoids and chest. And moving the arms forward (towards the head) leads to a significant increase in the load on the triceps.
Push-ups with different body positions
- Legs on support. In this case, you load the upper chest and deltoids. The higher the legs, the less the chest muscles are loaded and the greater the load falls on the triceps and deltoids.
- Wrists on support. The load shifts to the lower part of the pectoral muscles.
Specific and complicated push-up variations
- Fist push-ups. Allows you to relieve stress from your wrist and at the same time strengthen your knuckles.
- One-arm push-ups. The load can be varied by positioning the legs: the further apart they are, the easier it is to perform.
- Alternating. Bend your right (or left) arm at the elbow, lower your shoulder to your palm (turning your chest perpendicular to the floor as much as possible), and then take the starting position. Next time we perform the exercise in the other direction.
- Back of the hand push-ups are for the wrists and forearms.
- Push-ups on palms stacked one on top of the other at chest level, elbows to the sides - triceps.
- The palms are located above the head - the shoulders.
- Push-ups from a bench in the back position - triceps.
- Dips.
- Push-ups on the bar.
- Push-ups with jump and clap. When moving up, in a “jump,” lift your hands off the floor with a clap in front of your chest.
- Three-point push-ups (chest drops below the level of the legs and wrists, which rest on any three surfaces that are above the floor). Powerfully affects the entire shoulder girdle, biceps, triceps, and pectorals.
- Push-ups on dumbbells or special supports.
- Weighted push-ups.
- Stopped push-ups.
- Longitudinal and transverse wave push-ups.
How to start classes correctly
Even if a person has never played sports and many techniques cannot be performed by him, push-ups are basic exercises. The main element of the load is your own weight, therefore, when starting a lesson, it is necessary to take into account physical preparation.
If it is zero, it is recommended to start with a gradual increase in strength. Doing exercises from your knees can be a good start. In any case, at first it is necessary to pay more attention to the technique of execution, and not to the number of repetitions.
Before doing push-ups, you definitely need a warm-up to prepare your muscles and joints for the upcoming loads. To do this, you need to stretch your hands, elbows and shoulders, and also warm up your torso using rotations and bends.
If performing exercises is necessary to get back into shape after an injury, the loads should be performed in proportion to health, in no case overloading the body. At first, simplified versions of push-ups are performed, and after a few sessions you can move on to more classic ones.
You should not delay the transition - otherwise the body will remember the incorrect movements. When performing exercises, a person should feel muscle tension and try to keep his back straight. Your hands should be shoulder-width apart - the smaller the distance between them, the more difficult it will be to perform a push-up.
The housing should not bend or sag. You need to do push-ups with your whole body. Alternately move down and up from the plank position. Proper push-ups can replace even good exercise machines.
Get rid of excess fat
If you are serious about learning how to do 100 push-ups, then you should start by getting rid of excess fat, if you have any, of course. If you are a man and your body fat percentage is 10% or less, then you can skip straight to point two. If you are a girl and your body fat percentage is less than 20%, you can also skip to the second point.

But if your fat percentage is more than described above, you should reduce your percentage. One of the simplest ways is to reduce the number of calories consumed and increase their expenditure, that is, eat less and move more.
Therefore, if you eat too much, you need to reduce the amount of food you consume, or simply eat foods that are low in calories. You can also resort to cardio exercises. This method is effective for burning fat deposits and preserving muscle mass.
How to make wall push-ups harder
As mentioned earlier, this is the simplest type of push-up, so quite quickly the need arises for some options for complicating this exercise, otherwise it simply becomes boring, monotonous and ineffective.
The most obvious complication is to step back from the wall a longer distance, thereby increasing the angle between the torso and the surface of the wall, which increases the load on the target muscle groups.
However, it will not be possible to retreat too far, since as the angle between the body and the wall increases, the hands will begin to slide along the surface, making push-ups almost impossible. In this case, you can move on to a more advanced option - push-ups from a bench, sofa, cabinet, chair or any other object that can be used as a reliable, stable support. Bench push-ups can also be performed with both wide and narrow arms.
Another trick for those who find wall push-ups too easy is to increase the time you complete each repetition. The slower the movement is performed, the longer the muscles are under continuous load, which will also allow you to introduce new sensations into the training process.
You prefer quantity over quality
High-quality push-ups are always as complete as possible. But not everyone has such strong shoulders and wrists that they can reach the floor every time. In any case, try to lower your chest as low as possible, then exhale forcefully as you rise. This will make it more difficult for you, but that’s the point.
While at the very top, try to fully straighten your arms, as if you were pushing the floor away from you. And don't let your back arch. As you lower yourself, begin to inhale, mentally directing the air to your upper back.
It is known that push-ups make us stronger, but doing them well brings additional benefits.
First, try doing one push-up, but taking into account all the recommendations listed. Then repeat the movements evenly and slowly. The main thing is not the total number of push-ups, but how many of them you can do correctly.
Can everyone do this?
How to do 100 push-ups? Can everyone do this? This depends on the physiological characteristics and degree of muscle development at the start of training. Physiological characteristics include factors such as the presence of bone and cardiovascular diseases, weight, and age (in most cases it determines the first two factors). It should be noted that if you have problems with joints or bone tissue directly, you will have to forget about the 100-fold push-up record (if the disease is curable, it will be temporary), otherwise it may negatively affect your health. Heart problems are not so critical, but in this case the training time will be significantly extended (this depends on the specific diagnosis).
How many times should you do push-ups
In the first stages, you can perform push-ups up to 5 times in 5 sets. During execution, you need to watch your hands - they should not lie completely on the floor or extend all the way. Tension in the muscles should be maintained throughout the entire approach.
The break between repetitions should be about a minute. Gradually it is necessary to increase the number of exercises and approaches. Men increase intensity and quantity at a faster pace because their chest muscles are physiologically more developed. Women can exercise less intensely.
According to the chosen training program, the average number of exercises per session should be about 100 times - this is exactly the figure you need to achieve. At the same time, the final result depends on the number of repetitions and rest time. When training endurance, you need to increase the number of repetitions and reduce the rest time.
When training strength, it is necessary to increase the duration of rest. Therefore, the number of push-ups can be selected individually, not only depending on the level of training, but also the focus on a specific result.
“Do a hundred push-ups against all odds” OR how to do 100 push-ups
For many people, performing a proper push-up, let alone doing 100 push-ups, can be extremely difficult.
But, if you want to get stronger, then this 12 week plan will help you. In fact, it will help you learn to do 100 push-ups without stopping in 12 weeks!
The difference between this plan and the previous one is that here you perform the movement consistently and smoothly, without paying attention to technique.
I recommend this plan for those who are able to perform at least one full push-up. If you are still working on it, then it is too early for you to use this training plan.
You probably think it's impossible to do 30 or 50 push-ups, let alone 100 in one set, but trust me, anyone can do it! All you need is the right training plan and repetition.
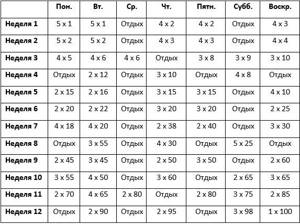
Let's move on to the diagram of how to do 100 push-ups, starting with one repetition per set. You are ready?
| Mon | W | Wed | Thu | Fri | Sat | Sun | |
| Week 1 | 5 x 1 | 5 x 1 | Rest | 4 x 2 | 4 x 2 | Rest | 4 x 3 |
| Week 2 | 5 x 2 | 5 x 2 | Rest | 4 x 3 | 4 x 3 | Rest | 4 x 4 |
| Week 3 | 4 x 5 | 4 x 6 | 4 x 6 | Rest | 3 x 8 | 3 x 9 | 3 x 10 |
| Week 4 | Rest | 2 x 12 | Rest | 3 x 10 | Rest | 4 x 8 | Rest |
| Week 5 | 2 x 15 | 2 x 16 | Rest | 3 x 15 | 3 x 15 | Rest | 4 x 10 |
| Week 6 | 2 x 20 | 2 x 22 | Rest | 3 x 20 | 3 x 20 | Rest | 2 x 25 |
| Week 7 | 4 x 18 | 4 x 20 | Rest | 2 x 38 | 2 x 40 | Rest | 3 x 30 |
| Week 8 | Rest | 3 x 55 | Rest | 4 x 30 | Rest | 5 x 25 | Rest |
| Week 9 | 2 x 45 | 3 x 45 | Rest | 2 x 50 | 3 x 50 | Rest | 2 x 60 |
| Week 10 | 3 x 55 | 4 x 50 | Rest | 3 x 60 | Rest | 2 x 65 | 3 x 65 |
| Week 11 | 2 x 70 | 4 x 65 | 2 x 80 | Rest | 2 x 80 | 3 x 75 | 2 x 85 |
| Week 12 | Rest | 2 x 90 | Rest | 2 x 95 | Rest | 3 x 90 | 1 x 100 |
The same training table in the picture to download to your computer.
How to use this program
In the 12-week push-up program, each workout is described by the numbers "2 x 10", for example.
- First digit = number of approaches
- Second digit = number of repetitions
The shorter your rest between sets, the better, but in later weeks, when you have to do almost 100 push-ups for a certain number of sets, increasing the rest time is simply necessary. There is no need to take a long break. Rest 5 minutes between sets to complete the required number of sets and reps.
If you cannot complete the target number of repetitions in one set, give yourself a few seconds to rest and continue until you complete everything.
I repeat, this program is for those who can do at least one push-up. It is designed specifically for beginners. If you do everything as expected, then by the end of week 12 you will be able to perform up to 100 repetitions.