Publication date: December 24, 2021.
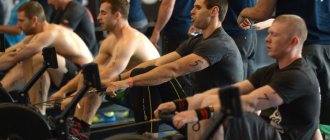
This device is one of the few that affects almost all muscles, but does it so softly that even older people can exercise on it.
Pros and cons of training on a simulator
Rowing machines are not as popular as treadmills or bicycles, although they are no less useful. And in terms of fat burning, rowing helps you get rid of extra calories much faster.
pros
The following positive points are highlighted:
- during work, almost all major human muscle groups are involved (legs, buttocks, pectoral, back, abs, arms, shoulders);
- high calorie consumption (about 8 kcal per minute);
- acceleration of metabolism.
Minuses
We can talk about the following negative aspects of using the simulator:
- intensive work will not allow you to engage in extraneous activities, watch TV and be distracted, since the movement technique is quite complex;
- It also puts a force load on the muscles, so not everyone can effectively burn calories on such a machine.
Rowing is a versatile type of training activity that allows you to achieve a wide variety of goals.
To get all the benefits of real rowing at home or in a sports club, you need to use only quality rowing machines.
The most realistic rowing simulation can only be achieved with water resistance rowing machines. First Degree Fitness has gone even further. The simulators of this brand not only completely imitate rowing (thanks to water resistance and similar biomechanics of movements), but also allow you to adjust the level of resistance directly during training.

This significantly diversifies training and allows you to achieve any sports goals:
— cardio training to increase endurance and strengthen the cardiovascular system;
- cardio training for weight loss;
— interval training;
- power training;
— sports training to improve athletic performance;
- training to improve well-being and emotional state.
Cardio training to increase endurance and strengthen the cardiovascular system
The objective indicator that you need to focus on is heart rate. The pulse during such training should not be very high, and the training itself should be relatively long and uniform.
The pulse must be kept at 120-130 beats per minute (average for an ordinary person). The workout lasts approximately 60 minutes. Exercise 3 times a week.
To monitor the correct heart rate, monitor the monitor readings and set the desired resistance level.
To more accurately draw up an individual training plan, consult your doctor and trainer.
Cardio training for weight loss
Due to the fact that almost all muscle groups work during rowing, it burns up to 1000 kcal/hour, which is a lot.
In order to lose weight, you can build a workout in an intensive mode or in an aerobic mode.
For the second case there is a developed formula.
Determine your maximum heart rate. To do this, you need to subtract your age (in years) from the number 220. The effective fat burning zone is approximately 70% of the resulting number. By training and maintaining this heart rate throughout the row, you can successfully burn excess fat.
Remember that if you have the wrong diet, all your training efforts will be in vain.
Interval training on a rowing machine
Only First Degree Fitness rowing machines are suitable for interval training, as only they allow you to quickly change the load.
The scheme of such a workout is quite simple - you work for three minutes in an intensive mode, then for one minute in a light mode. Then intense again and so on. The load can be adjusted both by changing the resistance of the simulator and by changing the speed (frequency) of strokes.
More complex programs are built into the simulator monitor. You can also ask a trainer and he will create an individual plan for you.
Power training
By setting a high level of resistance on the machine, you can focus your training on developing strength qualities and increasing muscle volume. Don't forget to warm up first by working for a while at a low level of load!
Training to Improve Athletic Performance
Some First Degree Fitness models allow you to participate in virtual competitions. In addition, you always have the opportunity to record your results and constantly improve them, comparing them with previous ones or with the results of other athletes. This technique motivates more, it is more interesting, more exciting.
Emotional training
Working out on a rowing machine with water resistance, like no other, helps cope with stress and improves your psycho-emotional state.
Training on the First Degree Fitness simulator is a complete analogy to real rowing, from sensations to sounds (the audible splash of water in the tank).
Don't believe me? Sign up for a test drive and come see for yourself!
What muscles work?
The following groups are involved in the work:
- body: back muscles - rectus abdominis, rhomboids, latissimus, as well as arm muscles (including biceps), chest muscles, shoulder girdle, less - abdominal muscles;
- lower body (to a lesser extent): quadriceps, buttocks.
Grip options
The execution is varied by alternating grips:
| Type of grip | Loaded muscle groups |
| Straight (classic) | If the palms are directed downwards, then the back muscles and triceps work |
| Back | Palms look up, biceps, chest, back, shoulder muscles are loaded |
In addition, by changing the position of the hands, it is possible to redirect the load to different muscle groups.
Execution technique
By following the correct technique, you guarantee muscle development, fat burning and no injuries.
In order for the classes to bring maximum benefit, you have to learn the technique of movements. Strengthening your back and improving your silhouette occurs in 3–4 months. The stroke consists of two phases:
- craving;
- return.
Traction
The lower limbs are straightened, the body is tilted back. The back and legs are mainly loaded. Arms are straightened, shoulders relaxed. At the end of the movement, the arms are bent and the shoulders are extended. The body is slightly tilted, the legs are straightened. The handle is pulled towards the abdominal muscles.
Return
Move forward, starting from the hip. The seat of the projectile moves towards the flywheel mechanism, and the trajectory of the upper limbs does not intersect with the trajectory of the lower ones.
Recommendations and common mistakes
Do not overload your body - increase the load gradually
Every time before training, do a warm-up to increase blood circulation and prepare the body for further stress.
The normal duration of rowing machine sessions is 50 minutes . During this time, the athlete manages to complete three sets of exercises.
Classes begin with 20 minutes, gradually extending them. The load regulator (if provided by the model) is set to the lowest level. The main goal when mastering the installation is to tone the body.
Intense and long-term training is contraindicated during this period. A sign that you can increase the load is the absence of muscle discomfort.
The most common mistakes that result in diseases of the musculoskeletal system:
- when performing movements, the load falls on the knees, which leads to the development of joint disease;
- keep your back bent;
- make sudden movements or suddenly stop the exercise.
Stop training if your health worsens in any way—weakness, dizziness, nausea. Despite the benefits of the rowing simulator, people with certain heart and vascular diseases and cerebrovascular disorders are not allowed to participate in training.
Postponed training until recovery in case of acute bacterial and viral respiratory tract infections, high body temperature, or general malaise. Before starting training, consultation with a doctor is necessary if you have chronic illnesses or are over 35 years old.
Technique for performing exercises on a rowing machine
The correct technique for performing exercises on a rowing machine should ensure active work of both the upper and lower parts of the body. For example, when running or riding a stationary bike, most of the time only your lower body is used. And when training on a rowing machine, almost the whole body works.
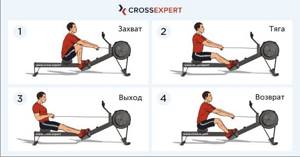
This 4-step instruction will tell you how to properly exercise on a rowing machine:
Recovery phase
At this stage of the exercise, the athlete’s entire body strives forward, sliding towards the legs. The whole body should be in a relaxed state and the muscles should not be tense. This state allows the simulator to easily bring the body into the following position: knees bent and arms straight.
To proceed to the capture stage, the body must be prepared. The case tilts slightly forward at one o'clock. The tilt angle should be no more than 30 degrees. Now the body is tense, and the movement comes from the hip. The feet rest tightly against the exercise machine, evenly distributing the load. The upper surface of the thighs is in contact with the body.
Capture
Accurate execution of this phase is directly related to the productivity of the entire exercise. Therefore, it is important to check your body positions again:
- arms straight;
- shoulders are straightened and in the same vertical line with the hips;
- the head is directed straight forward;
- almost the entire body weight is transferred to the feet (there should be a feeling of floating above the seat).
At the peak moment of capture the following sensations should be observed:
- the lower part of the body seems to be glued to the handle of the simulator;
- after “swinging the oar”, the resistance of the oar handle is felt at the moment of its deceleration;
- The back muscles and trapezius muscles are activated.
Breathing is combined with the rhythm of rowing. It is recommended to take one breath per paddle stroke. Exhale slowly throughout the remainder of the exercise. During active rowing, you can inhale and exhale during the recovery phase. It is imperative to choose the appropriate breathing rhythm for a particular athlete.
Pushing the boat
Start:
- In the starting position, the feet still rest against the machine and the arms are straightened. Next, the quadriceps are connected, with the help of which you need to push off strongly from the platform.
- Now the hamstrings are involved. At 1/3 of the stroke, when the handle is near the knees, the body deviates approximately at “11 o’clock”.
- When going through this part of the exercise, it is important to remember that in rowing it is important not to pull, but to push. The strength of the push sets the pace for the entire exercise process.
Ending:
- Now the elbows bend, and the biceps, brachioradialis and deltoid muscles of the back are involved in the work. The elbows are pulled towards the body at the level of the lower ribs. It is important not to bend your wrists, so as not to put unnecessary stress on the joints.
- The “pushing” force is achieved through the active involvement of the shoulders in the work. They gently retract back without lifting.
- All muscles of the body are activated in an ascending order - from weaker to stronger. This provides maximum power. First, the quadriceps and gluteal muscles are included, then the lower back, and finally the biceps, trapezius, brachioradialis, posterior deltoid, lateral, and rhomboid muscles.
End of the stroke
The last stage begins at the moment of full straightening of the knee joints. Now you need to mentally check your body position again:
- cravings stopped;
- the arms are straight, and the oar handle is in the solar plexus area;
- torso – with an 11 o’clock slope;
- core muscles are tense;
- neck and shoulders relaxed;
- direct gaze;
- elbows are lowered and pulled back;
- the wrists are straight and relaxed;
- the chest is slightly raised.
Two more important principles on how to properly row on a machine:
- The ratio of movement and rest should be equal to 1:2. It is better to withstand the recovery phase and not rush to move on to the next one. Very often athletes neglect this rule. No need to rush!
- The grip of the handle is soft and flexible. You don't need to squeeze your hand too hard to hold the handle: just hold it with your fingers.
Video of rowing technique on a rowing machine, short version with clear explanation:
Detailed video on how to properly perform an exercise on a rowing machine for beginners:
Exercises and training program
The basic complex includes a short and long stroke . The exercises are performed in 3 sets, each with 10–20 repetitions.
Short stroke
Starting position (hereinafter referred to as I.P.): sitting, lower limbs bent at the knee joint, feet secured with belts. Arms extended forward, grip straight. Slowly push off with your feet, move back, and at the end point pull your arms to your chest. Smoothly return to I.P.
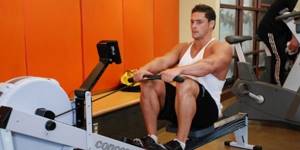
You need to exercise slowly to maintain not only the correct technique, but also your health.
Long stroke
IP: as with a short stroke, but the feet are fastened with straps so that the heels are slightly torn off the stop. The back is slightly rounded, the head is pulled forward, the arms are straightened, in a direct grip on the handles.
Choose the right time for training - this should be the period in which you are in the most alert state
Push off with the front of the foot, moving backward, straightening the torso. At the same time, bend your elbows and pull the handle towards your collarbones. Smoothly return to I.P.
The more you straighten your torso when performing the first phase of the exercise, the more your back and abdominal muscles are loaded.
It is recommended to tilt your torso 45 degrees.
Accented triceps training
IP: sit on the seat with your back forward, your legs are placed on the sides of the bench, resting on the floor, bent at the knees. With your arms bent at the elbow joints and behind your head, hold onto the handle. The arms are gradually straightened perpendicularly upward, giving a load to the triceps, then at the same pace they are returned to the starting position.
Targeted development of deltoid muscles
I.P.: standing in front of the simulator, legs spaced shoulder-width apart, back not rounded. The handle is held with palms down. Raise your arms until they form a parallel with the floor surface and lower them.
Training scheme
The content of the training program depends on the athlete’s preparation:
| Level | Training frequency per week (times) | How many approaches | Duration of the approach | Lesson duration (minutes) |
| Beginner (first 14 days) | 2–3 | 3 | 10 short and long strokes each | 15–20 |
| Average | 3 | 3 | 7 minutes | 30 |
| High | 4 | 5 | 10–12 minutes | 40–60 |
Take a 5-10 minute break between approaches. This time is intended for active rest, which involves stretching and light exercises to prevent the muscles from cooling down.
How to exercise correctly
A standard workout consists of 4 basic movements: catch, push, finish and recovery. Each manipulation has its own specifics, which are quite difficult to remember the first time. Therefore, experienced fitness trainers have developed a simplified training program. So, the actions on the rowing simulator consist of two parts.
First or let's start
To make it easier to understand, we count to 3. For each number there are the following events:
- 1 – pushing off with the legs, but the upper limbs are not tense;
- 2 – when the handle has reached the level of the kneecap, the hands begin to pull, and the body slowly leans back (does not lie down, but deviates by 30 - 45 degrees!);
- 3 – the back is open (tilt at 45 °), the arms are pulled closer to the stomach.
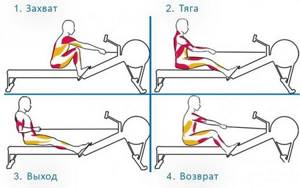
Attention: the procedure does not depend on the chosen model and on the price of the rowing machine.
You can train using this system both on the standard Neptune Challenge and on the professional Viking PRO.
Second or return to the starting position
In this part we also count to 3:
- 1 – arms gradually move forward (triceps work), the back is still tilted back;
- 2 – the body begins to tilt forward, the abs tense;
- 3 – only then do we begin to bend our legs, as if squatting (hips and calves work).
Do you want to purchase a high-quality rowing machine, the price of which is justified by premium quality and the use of innovative technologies? Contact the specialists of our company. We offer models for home, professional use and rehabilitation. You get a unique symbiosis of style and efficiency!
