≡ December 16, 2015 Category: Exercises by muscle group
Thanks to the glute bridge exercise, every girl has a unique opportunity to make her butt firm and pumped up by performing simple and effective movements. It is quite simple to implement and very practical. It can be performed by the fair sex, both in the gym and at home. Well, we will tell you how to do it correctly, and what recommendations regarding the technique of execution (classical, with a barbell) form the scientific and practical basis of the exercise.
The gluteal bridge is an excellent physical activity for anyone who wants to become the owner of a beautiful, firm butt. It can be performed as a warm-up exercise before the main workout, or as a completion of the program to consolidate the results on hip extension.
About the muscle ensemble
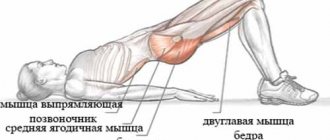
The glute bridge is a multi-joint functional movement that helps stretch the hips and activate the glutes. Pelvic lifts, which make the buttocks slender and toned, also have a tonic function that helps relieve and even prevent lumbar pain. The main muscles that work when performing the gluteal bridge are the small, medium and large muscles of the buttocks. Secondary are: the anterior and posterior muscles of the thighs, core, calves, spinal extensors.
The picture will help you get acquainted with the atlas of working muscles in more detail:
Technique and methods of performing the exercise
The good thing about the glute bridge is that there are a lot of ways to perform this exercise.
The easiest option for beginners is a glute bridge with two legs lying on the floor:
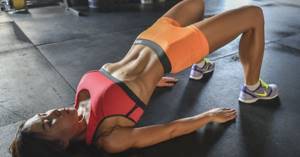
Classic glute bridge technique
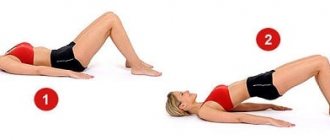
- Lie on your back, place your arms along your body, legs bent and your feet flat on the floor;
- The feet should be shoulder-width apart, and the angle at the knee joint should be 100-110 degrees;
- As you exhale, lift your pelvis until it is in a straight line between your body and your hips;
- At the peak, tighten your gluteal muscles as much as possible and hold for a few seconds;
- As you exhale, slowly lower your pelvis without relaxing at the bottom point. As soon as you touch the floor, repeat the movement.
A more advanced variation of this exercise is the unilateral glute bridge. This is when one - supporting - leg stands motionless on the floor, and the other remains suspended. Then the entire load falls on the supporting leg.

Technique with one supporting leg
When the previous technique of performing the exercise becomes easy enough, you can complicate it by placing your feet on an elevation. To do this, you can use a bench, barefoot or fitball. In this case, the amplitude of movement increases and the load increases.

Glute bridge using a fitball
You can also increase the range of motion by placing your body on an elevation:
- In this case, only the shoulder blades should rest on the fitball or bench;
- At the peak of the gluteal contraction, the body and hips should also reach a straight line;
- You need to lower your pelvis until your buttocks touch the floor.
The height of the bench will be different for different heights of people. On average, this is 40 cm. When performing the exercise, the back should not slide on the bench, and the elbows should not interfere. At the peak of the contraction, the line of the hips and body should be parallel to the floor, and the angle at the knee joint should be 90 degrees.

The gluteal bridge with legs elevated can be performed either with support on two legs or on one
For advanced athletes who work not only with their own weight, but also with additional weights, the glute bridge technique with a plate or barbell is suitable.
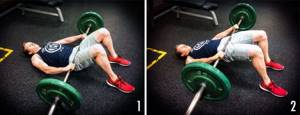
Option with a barbell
- The weight is placed on the hip bend. Don't put extra weight on your stomach!
- It is safer to perform a glute bridge while lying on the floor with a plate than with a barbell, since there is no chance that it will roll down;
- Hold additional weights on top. This will make it possible to more clearly feel the resistance when performing the exercise.
You can also use an expander or elastic band as a weight: the ends of the double-folded elastic band are fixed on the floor at the level of the hip crease, and the elastic band itself passes over the pelvis. When performing pelvic lifts, the muscles receive a different load at each moment. The higher the pelvis is above the floor, the stronger the resistance of the elastic band and the greater the load.
All previous versions of the gluteal bridge were dynamic. In statics, this exercise will also be quite effective. When maintaining the body position at the peak of muscle contraction (when the pelvis is raised above the floor), maximum effort is expended to counteract the resistance of gravity.
When performing the static version, other types of muscle fibers are activated, which improves the quality of muscle development.
Video: performing a gluteal bridge performed by Natalia Trifanova
About the advantages of pelvic lifts
Compared to squats, pelvic lifts do not put pressure on the lower back.
In addition, the training allows you to:
tighten the muscles of the buttocks without squats;
- strengthen the abs;
- perform training with your own and free weight;
- increase and strengthen the strength of the muscles that are involved in jumping and running;
- improve blood circulation in the pelvic organs (increase tone);
- increase libido;
- regulate weight by burning a large number of calories;
- train without additional equipment.
We recommend:
- How to do exercises for hips and buttocks correctly
- What does it take to get on the bridge?
- How to pump up your buttocks at home: exercise program
Adviсe
- Carefully monitor your breathing: exhale when raising your buttocks, inhale when lowering.
- Start your workout with a warm-up set of 20-25 reps without weight.
- Choose an additional weight so that you can do 10-15 repetitions, while the last of them are difficult for you.
- Don't forget about the preliminary warm-up!
The glute bridge is a great exercise that will help tone your glutes without bulking up your quads. Include it in your workouts at least once a week and you will soon notice the first positive results!
Is execution technique important?
The answer is yes. Even in such a simple exercise as the gluteal bridge, where it seems impossible to “deviate from the course,” you cannot do without it. Pelvic lifts in a step-by-step version are presented below.
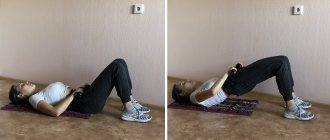
Step zero, or preparatory. Lie on a mat placed on the floor, bend your knees, placing your feet firmly on the floor. Hands lie on the stomach or along the body. That's all you need to know about the starting position.
Step one. As you inhale, squeeze your buttocks and raise your hips to the point where your body from your knees to your shoulders is in one line. Stay in the top position for a couple of counts, squeezing your gluteal muscles even tighter, exhale and return to the starting position for the next repetitions.
It all looks like the picture below:
Glute Bridge Variations
Glute bridge on the floor with weights
If you are performing a glute bridge on the floor, then be aware of one feature of this option - incomplete stretching of the gluteal muscles. Although in the upper position the maximum load is placed on them.
The starting position is lying on the floor. If possible, use weights. We take the projectile and place it on the pelvic bones. This could be a barbell or other objects. We bend our legs at the knee. Exhale and lift your pelvis with a strong push of your buttocks. At the top point, squeeze your buttocks tightly. After pausing for a couple of seconds at the top, smoothly lower your pelvis. There is no deflection in the lower back, the back is absolutely straight, the chest does not arch. When lifting the weight, focus on the heels, but the leg stands on the entire foot. The knees form a right angle. With proper technique, the back is not involved.
There is no need to choose a long bar, otherwise you will have difficulties with balance. In any gym you can find a one-kilogram Z-type bar. If you experience discomfort from the pressure of the barbell on the hip bones, then a rolled-up mat or a special roller will help you. And sometimes both are used. If the pancakes weigh up to 10 kilograms, then you can roll the barbell towards you over your straightened legs.
When you encounter a problem: when performing pelvic lifts, only the quadriceps are felt, which means you need to try changing the width of your feet, turning your toes differently, directing the impulse specifically from the gluteal muscles, making sure that your heels do not disconnect from the floor, choosing the optimal light weight . In practice, it is clear that not everyone uses a barbell. You can perform glute bridges with a weight plate or dumbbells of appropriate weight. The effect in all cases is amazing.
There should be a straight plane from the knee to the shoulder. When sagging is observed, this indicates unbearable weight, it needs to be reduced.
glute bridge on the floor with weights
Glute bridge on a bench with a barbell
A slightly more difficult, but most effective option is to work on a bench. To do this, you need to rest your upper back on the bench. The pelvic area is free, knees are bent. We place the barbell where the symphysis pubis is located, directly under the bones. That is, in the fold where the legs and body meet. We raise and lower the pelvis, not forgetting to activate the muscles of the back of the thigh and always the buttocks. The bench ensures maximum amplitude and depth of movements and the fastest results.
The main thing is that the bar does not roll back and forth and does not lie on your stomach. There are short curved bars weighing up to 10 kilograms and long Olympic bars weighing 20 kilograms. Short - good for beginners.
You can ask your comrades in the hall to help put the projectile on the body. If you choose 10-kilogram plates, you can easily roll the barbell towards you over your outstretched legs. Also, when working with light weights, you can place the bar on your hips while sitting on a bench, then lower yourself down. Or you can take care of creating a distance between the floor and the bar - put the plates on step platforms or any plates standing on the sides. When performing a pelvic lift from the bench, hold the barbell with your palms facing down.
The normal height of the bench is equal to the bottom line of the shoulder blades. On average it is 40 centimeters. A standard bench can be a bit high, so some people use step platforms and 4 lifts. It is important to rest comfortably on the edge and smoothly lift the pelvis. If this movement is performed with difficulty and with the participation of the elbows, then a lower bench is needed.
It is worth noting the American type of butt lift, which uses a low bench approximately in the middle of the back. The pelvis is lifted without supporting the shoulder blades, the entire back lies on the plane. This option works out the buttocks as much as possible.
We place our legs so that the shins are in a vertical position at the moment of lifting the pelvis.
In general, the technique briefly looks like this: tense your buttocks and do not relax, squeeze them as much as possible at the top point. Pushing off with your heels, we make up and down movements. At the bottom you can hang in the air or reach the floor.
There is no need to arch your lower back or round your chest. Don't look at the bar while bending your neck. If the pelvic area does not fully straighten at the top, then you need to reduce the weight. As with other variations of the exercise, you cannot stand on your toes and disconnect your heels. For a good effect, you need to gradually increase the weight of the weights.
glute bridge on a bench with a barbell
Glute bridge in the Smith machine
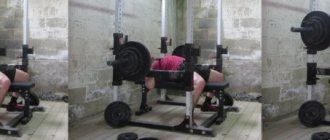
If you go to the gym, then you are familiar with the Smith glute bridge. We are talking about a convenient simulator. This projectile helps pump up the buttocks and tone the whole body. We are located right on the edge of the simulator bench. We press our feet together and spread our legs shoulder-width apart. We install the roller strictly on the hip bone. Keep your pelvis in the air. We put our hands on the roller.
To move correctly, we lift the pelvis up using the force of the gluteal muscles, placing it parallel to the body and hips. You only need to hover at the top for 2 seconds, then lower your pelvis and perform the movement again. You should go down as far as you can; it is advisable not to sit on the floor.
Glute bridge in the Smith machine Glute bridge in the Smith machine
Video - how to do a glute bridge
You should not limit yourself to the described types of pelvic lift. There are other exercise options without weights. For example, a glute bridge on one leg is very effective - the technique is exactly the same as in the case of a bridge without weight on the floor, but one of the legs is thrown over the other or straightened. Try this exercise and you will love its simplicity and accessibility. In addition, in the gym or at home you can do a glute bridge on a fitball; this exercise covers several important muscles and also tightens the buttocks well. If you want to add variety to your workouts, then think about what to replace the gluteal bridge with. You can do squats with or without weights instead.
Learning the intricacies of the exercise
The maximum benefit comes from the gluteal bridge, provided that the following recommendations are followed:
- the angle between the back surface and the lower leg should not be too small or large (the legs should be in a comfortable position);
- do not lift your feet off the floor during lifting;
- push to move upward using heels;
- lift the body off the floor as high as possible;
- peak contraction is carried out at the top point, where it is delayed for a couple of counts;
- you cannot rest at the lowest point;
- the weight of the burden is added gradually as fitness increases;
- do not pinch the nerve endings, do not rest your neck on the floor;
- It is recommended to perform 3 sets of 10 repetitions.
- Is a glute bridge effective for your butt?
If you believe American scientists (and there is no reason not to do this), who have conducted more than one study, then the exercise is very effective for working out the buttocks. The highest levels of electrical activity were recorded while performing a gluteal bridge from a bench. Next, the “places” were divided into the version with weights (barbell, plates) and with support on one of the legs.

That is why the gluteal bridge should be included in the training program, which is aimed at working out the female “center of the universe”.
Video: Glute bridge
How to perform actions correctly?
The technique, which is very simple, does not involve any special moments. This is due to the fact that the exercise is simply impossible to perform without following the instructions. The action that forms the basis of the gluteal bridge is similar to the natural one. Therefore, during its implementation, even beginners do not have any problems.
If we consider the main steps that are reproduced in the gluteal bridge exercise, they can be described as follows:
- Step - take the starting position lying on the floor on your back with your knees bent and your arms placed along your body.
- Step - from the starting position, placing your feet firmly on the floor, lift your hips by bringing your buttocks together and pushing the pelvic joint. Raise your body so that the line of your body from your shoulders to your knees forms a straight section. This point will be the maximum (see photo above). It is worth holding the body position in it for a few seconds.
- A step is a return from the maximum point to the starting position. When performing this movement, the buttocks must be squeezed even more to make the exercise more effective.
This is a classic glute bridge exercise, but not the last one. Its advantage is that there are other options for performing the same actions:
- getting up from a lying position on the floor or on a bench (leaning on your back or legs);
- bridge with support with only one leg;
- lifting with your own weight or with weights (with a barbell or plates).
The meaning of the action and its benefits remain the same. Only the method changes, as can be seen from the photo.

